
Imagine waking up to fresh eggs every morning without ever worrying about whether your chickens are safe, fed, or comfortable. No more rushing home to close the coop door before predators arrive. No more weekend trips cut short because someone needs to check on the flock. This is the promise of a smart chicken coop — and it is not science fiction. It is 2026, and automation technology has made backyard chicken keeping easier than ever.
Whether you are building your first coop or upgrading an existing setup, this complete guide will walk you through everything you need to know about creating a smart chicken coop that practically runs itself. We will cover the four core automation systems, provide step-by-step building instructions, break down costs for every budget, and help you avoid the mistakes that trip up beginners.
I built mine in Sweden, which means the automation had to survive a winter that regularly sits well below freezing, not just a rainy week. A door that works fine in a mild climate can fail outright when the actuator motor gets sluggish in the cold or the sensor housing fogs over — so everything below is written from a cold-climate build, not a fair-weather one.
As an Amazon Associate I earn from qualifying purchases.
What Makes a Chicken Coop “Smart”?
A smart chicken coop goes far beyond traditional wooden structures with nesting boxes. At its core, it is a coop equipped with automated systems that handle the repetitive, time-sensitive tasks of chicken keeping — freeing you from the daily grind while keeping your flock healthier and safer.
But what exactly qualifies as “smart”? Here are the defining characteristics:
Four Core Automation Systems
1. Automated Door Systems
The cornerstone of any smart coop. These doors open at sunrise and close at sunset (or on timers), ensuring your chickens can free-range safely while protecting them from predators at night. Modern systems include light sensors, timers, and even smartphone control.
2. Automated Feeding Systems
Smart feeders dispense the right amount of feed at scheduled times, preventing both overfeeding and underfeeding. Some advanced models even monitor consumption patterns and alert you when feed is running low.
3. Climate Control Systems
From simple thermostats controlling heat lamps to sophisticated systems managing ventilation, heating, and cooling automatically. Temperature sensors trigger fans, heaters, or cooling systems based on real-time conditions inside the coop.
4. Monitoring & Alert Systems
WiFi cameras let you check on your flock from anywhere. Environmental sensors track temperature and humidity. Smart alerts notify you instantly if something goes wrong — a door malfunction, extreme temperatures, or unusual activity suggesting predators.
The Benefits of Automation
Why invest in a smart coop? The advantages extend beyond mere convenience:
Predator Protection: An automatic coop door never forgets to close. Your chickens are protected every single night, even when you are working late or away for the weekend. My own door runs on a sunrise/sunset offset through Home Assistant rather than a flat clock time — it’s the difference between a door that closes at “6 p.m. every day” and one that actually tracks dusk as the season shortens.
Healthier Chickens: Consistent feeding schedules and optimal climate conditions lead to less stress, better immune systems, and higher egg production. When a bird does get sick, catching it early matters — the chicken diseases and treatment guide covers the signs, common illnesses, and first-response steps.
Freedom & Flexibility: Travel without arranging coop sitters. Work late without worrying. A smart coop gives you back your time while ensuring your flock thrives.
Early Problem Detection: Monitoring systems catch issues before they become disasters — whether it is a heat lamp failure in winter or a water shortage in summer.
Data & Insights: Smart systems track patterns over time, helping you optimize feed consumption, identify seasonal changes in behavior, and make data-driven decisions about your flock.

The Complete Build Process: From Planning to Automation
Phase 1: Planning Your Smart Coop
Before lifting a hammer or buying equipment, thoughtful planning prevents costly mistakes. Here is what to consider:
Space Requirements
Standard recommendations suggest 3-4 square feet per chicken inside the coop, plus 8-10 square feet per bird in an outdoor run. However, smart coops with automated systems can sometimes accommodate slightly less space because chickens spend more time free-ranging safely with reliable automatic doors. For exact sq-ft targets by flock count, breed weight class, and climate zone, see our complete chicken coop size guide.
Location & Orientation
Position your coop with the door facing east or southeast for morning sun exposure. This natural light helps trigger the automatic door sensors correctly and encourages early egg laying. Avoid low-lying areas that flood and ensure proximity to power sources for electric automation components.
Power Planning
Smart systems need electricity. Plan for:
- Standard 110V outlets for most devices
- Outdoor-rated extension cords or buried conduit
- Solar panel options for off-grid locations
- Battery backup systems for critical components like doors
Future Expansion
Design with growth in mind. Leave space for additional automation modules. Run extra conduit during initial construction — it is infinitely easier than retrofitting later.
Phase 2: Building the Foundation
While this guide focuses on automation, the physical structure must be sound. Key construction principles include:
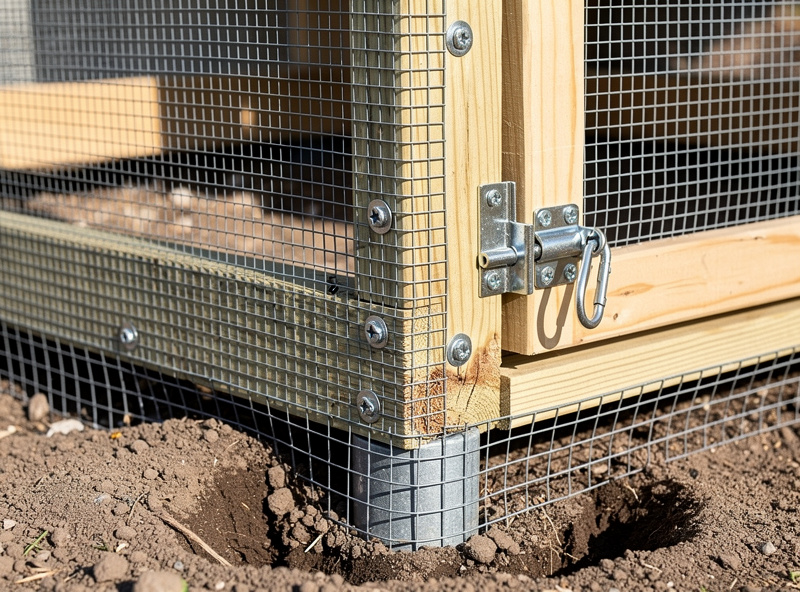
Materials: Pressure-treated lumber for the frame, weather-resistant plywood for walls, and metal roofing for longevity. Predator-proof hardware cloth (not chicken wire) covers all openings.
Ventilation: Critical for health but often overlooked. Plan for 1 square foot of ventilation per 10 square feet of floor space. Position vents high to avoid drafts on roosting chickens.
Automation Mounting Points: Reinforce door frames for automatic door mechanisms. Install sturdy brackets for feeders and cameras. Run conduit for wiring before closing walls.
Accessibility: Design for easy cleaning and maintenance. Large doors, removable roosts, and accessible nesting boxes make automated systems easier to install and service.
Phase 3: Installing Core Automation Systems
This is where your coop becomes “smart.” Install systems in this recommended order:
Step 1: Automatic Door
Start with the door — it is the foundation of predator protection. Mount the motor mechanism securely to a reinforced frame. Test the light sensor positioning to ensure it detects dawn and dusk accurately at your location. For detailed guidance on selecting and installing the right door, see our complete automatic door buyer’s guide.
Step 2: Feeding & Watering Systems
Install feeders at back height to prevent contamination. Connect automatic waterers to a reliable water source with float valves or electronic sensors. Consider heated water bases for winter climates. Learn about the best automated options in our automated feeders and waterers guide.
Step 3: Climate Control
Mount temperature sensors away from direct heat sources. Install ventilation fans with thermostatic controls. Add heat lamps or radiant heaters with smart switches. Solar-powered vents work well for hot climates.
Step 4: Monitoring Equipment
Position WiFi coop cameras with overlapping coverage. Install the main camera inside the coop showing roosts and nesting boxes. Add a second camera covering the run and door area. Test night vision capabilities thoroughly.
Phase 4: Integration & Smart Controls
The magic happens when systems work together:
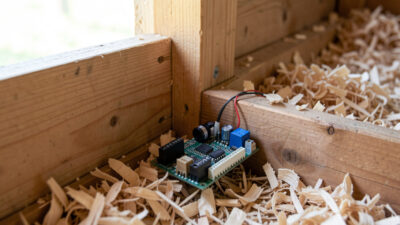
Central Hub Setup: Many modern systems connect to central apps or home automation platforms like Home Assistant. This creates a unified dashboard showing door status, temperature readings, camera feeds, and feed levels in one place. I run Home Assistant as the brain of my own setup — the door fires off a sunrise/sunset offset rather than a fixed clock time, the heated waterer sits behind a freeze-watch automation, and the coop cameras have motion zones so a leaf blowing past the run doesn’t trigger the same alert as something walking up to the wire.
Automation Rules: Set intelligent triggers — if temperature drops below 35 degrees, activate the heater. If the door fails to close, send an emergency alert. If feed levels drop below 20%, send a reorder reminder.
Backup Systems: Smart does not mean failure-proof. Maintain manual overrides for all critical systems. Keep battery backups charged. Have a contingency plan for power outages.
Auto-Door Comparison: Three Systems I’ve Run Side by Side
The auto-door is the single upgrade that matters most, so it’s worth comparing the mechanisms rather than just the price tags. I’ve mounted and cycled a Run-Chicken (the self-contained light+timer unit), a ChickenGuard (Premium/Extreme with the manual override), and an Omlet Autodoor through a full year of Swedish daylight swing — here’s how they actually differ once the light drops fast in October and the actuator has to fight cold grease in January.
| Door | Trigger method | Failure mode | Cold-weather note |
|---|---|---|---|
| Run-Chicken (T50/T55) | Light sensor + timer backup | Fails closed if the light sensor is obstructed | Self-contained battery pack struggles below freezing unless kept in an insulated housing |
| ChickenGuard Premium/Extreme | Light sensor or fixed timer, selectable | Heavier door body, manual override lever if the motor stalls | The heavier door and geared motor handle cold-stiff hinges better in my experience |
| Omlet Autodoor | App-scheduled with light-sensor option | App/Wi-Fi dependent for schedule changes, physical door still cycles on its own clock | Reliable cycling, but a Wi-Fi dead zone at the run edge means I can’t always push a same-day schedule change |
None of the three is universally “best” — a fail-open door is worse than no door at all, so whichever unit you run, know what it does when the motor stalls or the battery dies, and keep a manual override you’ve actually practiced using before you need it in the dark.
Cost Breakdown: Building for Every Budget
Smart coops range from surprisingly affordable to fully loaded. Here is what to expect at each tier:
Basic Smart Coop: $300-$500
Perfect for testing the automation waters:
- Automatic door with light sensor: $150-$250
- Basic gravity feeder: $30-$50
- Standard waterer with auto-refill: $25-$40
- Basic WiFi camera: $40-$60
- Simple thermostat-controlled heater: $50-$100
This setup handles the essentials: predator protection, consistent feeding, and basic monitoring.
Mid-Range Smart Coop: $800-$1,500
The sweet spot for most backyard keepers:
- App-controlled automatic door: $250-$400
- Timed/programmable feeder: $80-$150
- High-capacity auto waterer with heater: $60-$100
- Multi-camera system with cloud storage: $150-$300
- Environmental sensors (temp/humidity): $50-$100
- Smart switches and outlets: $100-$200
- Better insulation and climate control: $100-$250
Includes remote monitoring, scheduled feeding, and comprehensive climate management.
Full Automation: $2,000-$4,000+
The ultimate hands-free experience:
- Premium automatic door with battery backup: $400-$600
- Smart feeders with consumption tracking: $200-$400
- Automated watering system with filtration: $150-$300
- Professional security camera system: $400-$800
- Advanced environmental controls: $300-$600
- Automated ventilation with air quality sensors: $200-$400
- Integrated app ecosystem: $100-$200
- Egg counting automation: $150-$300
- Solar power system: $300-$800
For budget-conscious builders, our DIY smart coop under $200 guide shows how to start small and scale up affordably.
Common Mistakes Beginners Make
Learn from others’ failures to save time, money, and heartache:
Mistake 1: Over-Automating Too Quickly
Installing every gadget at once leads to integration nightmares and unexpected failures. Start with one or two core systems, master them, then expand.
Mistake 2: Ignoring Power Reliability
A power outage should not trap chickens inside or leave them vulnerable. Always install battery backups for doors and maintain manual overrides.
Mistake 3: Poor WiFi Coverage
Cameras and smart devices need strong signals. Test WiFi strength at the coop location before buying equipment. Consider WiFi extenders or mesh networks.
Mistake 4: Inadequate Ventilation
Automated climate control cannot compensate for poor airflow. Chickens produce significant moisture. Without proper ventilation, respiratory issues develop regardless of temperature control.
Mistake 5: Choosing Cheap Over Quality
Bargain automatic doors fail at the worst moments. Invest in reputable brands with good warranties. A door that jams open at midnight invites disaster. The same logic applies to the coop itself — for buyers committing 5+ years, brand selection matters more than the upfront price gap. Our complete chicken coop brands comparison ranks the 10 brands and retailers worth shopping in 2026.
Mistake 6: Neglecting Maintenance
Even smart systems need care. Clean sensors monthly, check batteries quarterly, lubricate door mechanisms, and update firmware regularly.
Mistake 7: Forgetting Predator Proofing
Automation helps, but hardware matters. Bury wire mesh 12 inches deep to stop digging predators. Use 1/2 inch, 19-gauge hardware cloth — chicken wire stops chickens, not raccoons; a determined raccoon can bend and worry at lighter-gauge mesh, and gaps larger than a half inch let smaller predators like weasels through entirely (Garden Betty). My own run frame is welded steel clad in hardware cloth with a buried apron rather than a straight vertical trench — a predator that hits an apron it can’t dig under usually gives up faster than one that just has to dig deeper.
Smart Coop Technology: Current State in 2026
The smart coop market has matured significantly. Here is what is available now:
Door Automation Evolution
Early automatic doors used simple light sensors prone to malfunction on cloudy days. Modern systems offer:
- Dual-sensor technology (light + timer backup)
- Smartphone app control with manual overrides
- Battery backups lasting 30+ days
- Integration with home automation systems
- Multiple power options (AC, solar, battery)
Feeding Technology Advances
Today’s smart feeders do more than dispense food:
- Portion control down to the gram
- Multiple daily feeding schedules
- Consumption tracking via app
- Low-level alerts sent to your phone
- Rodent-resistant designs
- Weatherproof construction
Monitoring & IoT Integration
The biggest leap forward is connectivity:
- AI-powered cameras that detect unusual activity
- Temperature sensors with historical data logging
- Humidity monitoring preventing respiratory issues
- Integration with Alexa, Google Home, and Home Assistant
- Automated egg counters using computer vision
Cold-Climate Automation: What Changes Below Freezing
Most smart coop content is written for a mild climate and quietly assumes the hardest problem you’ll face is a light rain. Running a coop through a Swedish winter taught me a different lesson: the automation that matters most in the cold isn’t the camera or the app, it’s the parts that manage moisture and water.
Frostbite is a moisture problem, not just a cold problem. University extension research is consistent on this: it’s condensation and trapped humidity inside the coop — not the outdoor temperature on its own — that drives frostbite on combs and wattles, because damp tissue freezes far more easily than dry tissue (Ohio State University Extension, eXtension Poultry). That’s why I run ridge and soffit ventilation sized to dump moisture, not to draft the birds — vents stay high, above roost height, so air exchanges without a cold stream blowing directly on sleeping chickens.
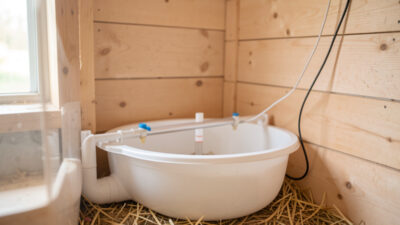
A heated waterer isn’t a luxury item once you’re regularly below freezing. I lost a waterer to a solid block of ice more than once before I wired a thermostatically-controlled heated base into the same freeze-watch automation that also flags the coop sensors if the temperature keeps dropping overnight. A waterer that’s frozen solid by 7 a.m. is a bigger daily failure than almost any door or camera problem.
Battery-only auto-doors get sluggish in real cold. The actuator motors on light, self-contained doors visibly slow down once the grease inside stiffens up in deep cold — it’s worth testing your door’s cycle speed on the coldest night of the year, not just in October when it’s a comfortable trial run.
What the Cameras Actually Catch at the Wire
Camera footage is more useful for predator identification than most first-time builders expect, but only if the camera can actually see in the dark. The cheap Wi-Fi units that look fine on a porch tend to die right at the edge of the run — the IR range is short, the sensor is grainy past ten feet, and the exact moment something is testing the wire is the moment you get an unusable blur. A proper PoE camera with real IR night vision, wired into the same hub the rest of the automation runs on, is the difference between a clip you can actually identify a predator from and one you can’t.
Over enough nights, a coop camera builds something close to a local predator profile, and it’s worth knowing what you’re actually watching for, because the response is different for each:
- Fox: tests the perimeter repeatedly, looks for a gap or a weak latch rather than trying to force an opening — a dig apron and a latch a paw can’t work defeats it.
- Hawk or other raptor: a daytime threat, not a nighttime one — the run needs overhead cover, not just wall protection, or free-ranging birds are exposed from above.
- Mustelid (weasel, mink): can fit through gaps a fox or raccoon never could, which is exactly why half-inch mesh is the standard and not a suggestion.
- Neighborhood dog: often the most damaging single event because it’s usually not deterred by the same caution a wild predator has — a secure run matters as much for the dog next door as for the fox.
- Rodents: less dramatic but a real feed-waste and disease-vector problem, which is where a rodent-resistant treadle feeder earns its cost back over a bargain gravity feeder.
None of this replaces good hardware — cameras tell you what already got close, not what to build. But watching a season of clips is what actually teaches you which parts of your specific setup are weak, because every property’s predator mix is a little different.
Planning Your Smart Coop Upgrade Path
You do not need to build everything at once. Here is a strategic upgrade sequence:
Month 1: Install automatic door — the single most impactful upgrade for predator protection and freedom.
Month 2-3: Add automated feeder and waterer — eliminates daily chores and ensures consistency.
Month 4-6: Install WiFi camera system — gain peace of mind and remote monitoring capability.
Month 7-12: Integrate climate control and environmental sensors — optimize comfort and health year-round.
Year 2: Add advanced features like egg counting, solar power, and full home automation integration.
This gradual approach spreads costs, lets you learn each system thoroughly, and ensures reliable operation before adding complexity.
The Bottom Line: Is a Smart Coop Worth It?
After helping hundreds of chicken keepers automate their coops, the answer is clear: for most people, yes — with caveats.
A smart coop is worth the investment if you:
- Value flexibility to travel or work irregular hours
- Live in an area with significant predator pressure
- Keep more than 6-8 chickens (time savings scale with flock size)
- Want optimal egg production through consistent care
- Enjoy technology and data-driven management
It may not be worth it if you:
- Have only 2-3 chickens in a secure urban setting
- Work from home with a flexible schedule
- Live in a mild climate with minimal predator threats
- Prefer traditional, low-tech approaches
For most backyard chicken enthusiasts, starting with a basic automatic door ($150-$250) provides 80% of the lifestyle benefits at 20% of the full system cost. From there, expand based on your specific needs and budget.
My own build didn’t happen in the order I’d recommend to someone starting today — I wired the door first, then spent a full winter fighting a waterer that kept freezing before I finally put a heated base behind a proper freeze-watch automation. If I were starting over, the waterer and the door would go in together, on day one, because losing water access overnight is just as serious as losing predator protection.

Next Steps: Your Smart Coop Journey Starts Here
This guide provided the big picture. Now dive deeper into specific areas:
New to chicken keeping? Start with our backyard chickens for beginners guide to master the fundamentals before adding automation.
Ready to shop? Our best smart coop devices roundup compares top-rated products across every category.
Want the most popular upgrade? Read our automatic chicken coop door buyer’s guide — the #1 first step into coop automation.
Need feeding solutions? Explore automated feeders and waterers for set-it-and-forget-it daily care.
Want full monitoring? Check out our guide to cameras, sensors, and monitoring apps.
On a tight budget? Our DIY automation under $200 guide proves smart coops do not require deep pockets.
Whether you are building from scratch or upgrading an existing coop, 2026 is the perfect time to automate. The technology is mature, prices are reasonable, and the time savings are immediate. Your future self — enjoying fresh eggs without the daily grind — will thank you.
Smart Chicken Coop Deep-Dive Cluster: 15 Topic Guides
Each automation, build, and operations topic above has its own in-depth guide. Use these to go deeper on any decision point as you plan, build, or operate your smart coop.
Build & Planning
- Smart Chicken Coop Planning: Blueprint Before You Build — site selection, sun mapping, pre-wiring, and the 4-hour planning session
- How to Size a Smart Chicken Coop for Your Flock — flock-count math plus the automation-zone footprint adder
- Smart Chicken Coop Permits & HOA Rules in the US — zoning, building, electrical, and HOA approval timelines
- Smart Chicken Coop Cost: Real 2026 Build & Operating Numbers — every line item from lumber to sensors plus 5-year TCO
Power & Wiring
- Smart Chicken Coop Wiring: Electrical & Low-Voltage Layout — AC vs 12V, conduit, GFCI, and weatherproofing details
- Off-Grid Smart Chicken Coop: Solar Power & Battery Setup — Wh budgets, panel sizing, LiFePO4 selection
- Smart Chicken Coop Battery Backup for Power Outages — UPS sizing, 12V deep-cycle setups, what to back up
- Chicken Coop WiFi: Range, Mesh & Cellular Backup — signal targets, mesh placement, cellular failover
Operations & Safety
- Smart Chicken Coop Maintenance: Monthly & Seasonal Checklist — what to check, when, and replacement intervals
- Smart Chicken Coop Safety: Failsafes Every Setup Needs — the six failsafes plus the annual audit
- Smart Chicken Coop Mistakes: 9 Errors First-Timers Make — the costly errors and how to avoid each
Decision Aids
- Smart Chicken Coop vs Traditional Coop: Side-by-Side — capability, cost, and reliability compared
- Smart Chicken Coop ROI: When Automation Pays for Itself — time savings, predator prevention, payback math
- Smart Chicken Coop Kit vs DIY: Which Path is Right — cost, time, capability, and cloud-dependency tradeoffs
- Retrofit a Standard Chicken Coop into a Smart Coop — upgrade an existing coop in one weekend
Frequently Asked Questions
How much space do chickens need in a coop?
The golden rule of chicken math is to provide at least 4 square feet of interior coop space per bird, plus 10 square feet per bird in the outdoor run. Overcrowding leads to stress, pecking, and disease.
What is the best siding for a chicken coop?
Exterior-grade T1-11 plywood or LP SmartSide panels are excellent choices because they are durable, insulate well, and effectively block heavy winds. Ensure the floor is wrapped in hardware cloth to stop digging predators.
Does the coop need to be elevated off the ground?
Yes. Elevating the coop floor 12 to 18 inches off the ground prevents the wood from rotting, denies rodents a place to burrow, and provides a dry, shady spot for the chickens to dust bathe.
Can I use chicken wire for the run enclosure?
Absolutely not. Chicken wire is only meant to keep chickens in. Predators like raccoons and foxes can easily tear through it. You must secure all windows and run walls with 1/2-inch welded hardware cloth.
How much does a smart chicken coop cost?
A basic smart coop with an automatic door costs $300-$500. Mid-range setups with app-controlled doors, cameras, and feeders run $800-$1,500. Full automation including climate control and solar power costs $2,000-$4,000 or more.
Can I build a smart coop myself?
Yes, most smart coop projects are DIY-friendly. Basic carpentry skills, a cordless drill, and the ability to follow wiring diagrams are all you need. Start with an automatic door and expand from there over several months.
What actually causes frostbite on a chicken’s comb?
Trapped moisture, not cold air on its own. Condensation and humidity inside a poorly-ventilated coop make combs and wattles far more prone to freezing than the same temperature in a dry, well-vented coop. Ventilation that removes moisture without drafting the roost is the real fix.
Related Articles
Related Guides
Water-Level and Flow Sensors: Knowing the Waterer Is Empty Before They Do
A coop water-level sensor tells you the drinker is going dry — or freezing solid — before the flock does,…
Ammonia Sensors for the Coop: Catching Air Problems Before You Smell Them
An ammonia sensor belongs at the birds’ breathing height, close to the litter where the gas is generated, because that…
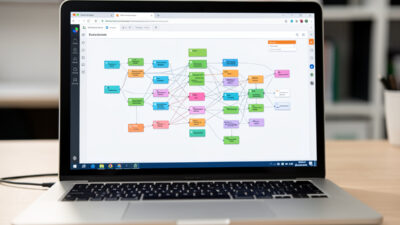
Node-RED vs Home Assistant Automations for the Coop: When to Use Which
Use native Home Assistant automations for the coop’s simple, safety-critical rules — the sunrise door, the freeze-watch waterer — and…