
Smart chicken coop safety rests on six failsafes: a door-close obstruction sensor, a manual override on every automated component, a temperature high-alarm, a low-battery alert path, GFCI on all AC circuits, and a fire-rated heater (if used) on a thermostatic switch. Every smart coop should have all six. Skipping one is the difference between automation that protects the flock and automation that quietly kills it.
This guide walks through what each failsafe does, how to verify it actually works, and the specific failure modes each one prevents. I run all six on my own coop, and the annual audit at the end is the same walkthrough I do every fall before the first hard freeze. For overall build context, see our complete smart chicken coop guide.
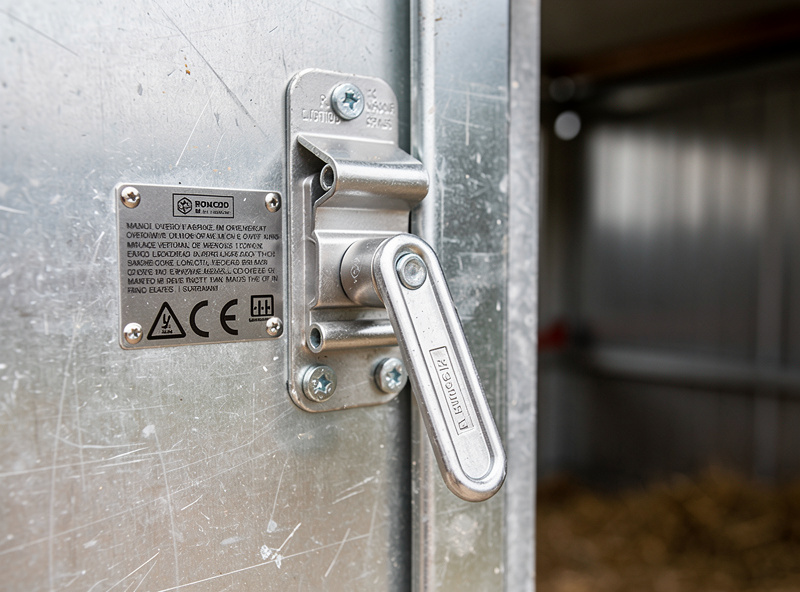
Failsafe 1: Door Obstruction Detection
Auto doors cause two flock-killing failures: closing on a chicken (crush injury) and failing to close (predator gets in). The fix is the same — an obstruction-detection door:
- Current-sensing motors stop the door when resistance spikes (a chicken’s leg). Most quality auto doors have this. Test by holding a wooden dowel under the closing door; it should reverse within 1 second.
- Light-curtain or beam-break sensors at the door opening detect chickens in the path. More precise but $40–$80 add-on.
- Pressure-bar at door bottom stops the door if anything pushes back. Usually built into premium doors, $50–$80 to retrofit.
Do not rely on simple timer-only doors. A timer that closes the door at exactly 8 PM does not know whether all chickens are inside. The cheap doors that lack obstruction detection cause more serious injuries than they prevent. I run the dowel test on the door I’ve got mounted every fall — takes ten seconds and it’s the single cheapest peace-of-mind check on this whole list.
Failsafe 2: Manual Override
Every automated component must be operable manually if its electronics fail or batteries die. Specifically:
| Component | Manual Override |
|---|---|
| Auto door | Hand crank, removable cord, or release lever to operate manually |
| Auto feeder | Lift-out feed pan or removable lid for manual filling |
| Auto waterer | Standard fill point bypassing electric pump or float |
| Ventilation fan | Manual switch in addition to thermostatic control |
| Heat lamp / heater | Plug-in outlet (just unplug if needed) |
| Light strip | Manual switch alongside automated control |
Test every override at fall winter prep. Many keepers discover their auto door’s manual lever has rusted or jammed only when they need it during a multi-day power outage. A 30-second annual test prevents the panic.
Failsafe 3: Temperature High-Alarm
Chickens tolerate cold far better than heat. Egg production and feed intake drop sharply once coop temps climb into the 90–95°F range, and heat exhaustion becomes a real risk from there up (Penn State Extension’s hot-weather poultry management guide breaks down the stress bands in detail). Every smart coop in a warm climate needs a high-temp alarm:
- Set the alert threshold at 90°F (32°C). Gives you 1–2 hours to respond before damage starts.
- Trigger ventilation fans automatically below alarm. Fans should kick in at 85°F so heat does not spike to alarm level in normal weather.
- Send alerts via two channels. WiFi notification + SMS (via SmartThings, Home Assistant, or similar). One channel can fail.
- Verify fan operation under load. A fan that runs unloaded may stall under summer humidity. Test in late June with everything closed up.
A low-temp alarm matters in very cold zones too — set at 20°F (-7°C) to catch heater failures that would let pipes freeze and waterers ice over. See our monitoring guide for sensor placement.
Failsafe 4: Low-Battery Alert Path
Sensors and auto doors all run on batteries. They all fail eventually. The failure is silent unless you have:
- Per-device low-battery alerts. Most modern smart-home platforms (SmartThings, Home Assistant, Apple Home) send notifications at 20% remaining.
- Periodic device-online check. A heartbeat alert if a sensor stops reporting for 6+ hours, regardless of battery state.
- A spare battery stash. CR2032 coin cells, AA batteries, and the door’s specific battery type kept in a labeled box at the coop.
A common failure mode: the sensor’s last battery report is “85%” — then a week later the sensor goes silent and never sends a low-battery warning because the battery dropped too fast. Heartbeat alerts catch this; battery alerts alone do not.
Failsafe 5: GFCI on All AC Circuits
Damp environments + electricity = electrocution risk for both you and the chickens. Every 110V circuit feeding the coop needs a GFCI breaker (or GFCI outlet) — required by NEC code and by basic safety:
- GFCI breaker at the house panel protects the entire run.
- GFCI outlet at the coop as a secondary protection, even if the breaker is GFCI.
- Test the GFCI quarterly. Press the test button, verify the trip and reset. Replace any unit that hesitates.
GFCI nuisance tripping is common in damp coops. If your GFCI trips after every rain, the cause is moisture in an outlet or junction box — fix the moisture, do not bypass the GFCI. See our wiring guide for proper damp-location box sealing.
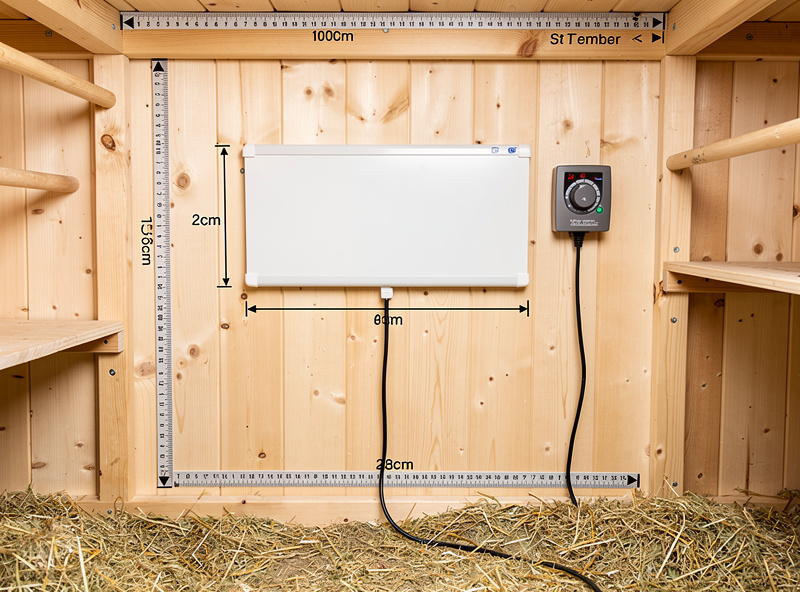
Failsafe 6: Fire-Safe Heater Setup
Heat lamps cause more coop fires than any other component in a backyard flock — the National Fire Protection Association flags them as the top ignition source in DIY coops and brooders, mainly from a bulb mounted too close to bedding or a flammable brooder box (NFPA’s coop fire and electrical safety guidance). A safe heater setup:
- Use a flat-panel radiant heater, not a bulb. Sweeter Heater, Cozy Coop, or similar. No exposed bulb, no dust ignition risk.
- Plug into a thermostatic outlet (Thermo Cube TC-3, around $20). Heater only runs when temperature drops below set point, eliminating runaway heating.
- Mount above 3 feet from any combustible surface. Ceiling-mount preferred. No bedding, no roost wood, no dry hay within 24″ of the heater.
- Verify cord is rated for the load. 14 AWG minimum for any heater drawing more than 5A. No extension cords for heaters — hardwire or use a dedicated short cord.
- Smoke detector inside the coop. $20 battery-powered detector, mounted high, tested at fall prep. Many smart smoke detectors integrate with home automation for SMS alerts.
If you are not in zone 3 or colder, the safest answer is no heater at all. Adult chickens with proper bedding handle 10°F nights without supplemental heat. Heat lamps cause more deaths through fire than they save through warmth.
Predator-Specific Safety
Smart coops add electronic vulnerability that traditional coops do not have. Three predator-related concerns specific to automation:
- Auto doors close earlier in winter. A door set to close at sunset will close at 4:30 PM in late December — before a slow hen makes it back. Use a “delay close until X minutes after sunset” setting, or shift to camera-confirmed close. My door runs on a sunrise/sunset offset in Home Assistant rather than a flat clock time — it’s the difference between catching a slow hen in December and shutting her out.
- Cameras attract human visitors. Visible cameras on a coop can signal “valuable property” to thieves. Mount inconspicuously or pair with motion-activated outdoor lighting.
- Cabling becomes predator highway. Loose cables outside the coop give raccoons paw-holds to climb. Run cables in conduit or up the coop wall, not loose on the ground — the last raccoon my cameras caught at the wire was testing exactly that kind of loose cabling on a neighbor’s setup, not mine.
The Annual Safety Audit
Once a year, walk through this checklist. Total time: 30 minutes:
- Test door obstruction detection with a wooden dowel. Door should reverse.
- Test manual override on auto door. Should operate cleanly.
- Verify high-temp alarm fires at the set point (use a hair dryer near the sensor).
- Verify low-temp alarm fires (insulated icepack near the sensor for 5 minutes).
- Test every GFCI by pressing the test button; verify reset.
- Run smoke detector test cycle.
- Verify heater thermostatic cycling (heat the sensor; heater should turn off).
- Pull wall-power for 30 seconds; verify backup runs all critical loads (covered in our battery backup guide).
- Inspect every cable for chew damage or insulation cracks.
- Confirm spare batteries on hand for sensors and door.
This audit takes one Saturday morning a year and prevents 90% of preventable smart coop failures. Run it in early fall — before winter weather puts maximum stress on every system.

Cost of the Six Failsafes
| Failsafe | Added Cost (if not already present) |
|---|---|
| Obstruction-detection door (vs basic timer door) | +$80–$150 |
| Manual override (usually built in) | $0 |
| High-temp alarm sensor + setup | $30–$60 |
| Low-battery / heartbeat alerting | $0 (config) — $100 (hub if needed) |
| GFCI breaker + outlet | $30–$80 |
| Thermostatic outlet + flat-panel heater | $80–$150 |
| Smoke detector inside coop | $20–$40 |
| Total premium for full safety stack | $240–$580 |
The full safety stack adds 15–25% to a basic smart coop build. It is the single highest-ROI category of spending — prevents flock-loss events that cost 5–10x the safety hardware.
Frequently Asked Questions
What is the most important safety feature in a smart chicken coop?
Door obstruction detection is the single most critical feature. Auto doors that close on chickens cause crushing injuries and deaths; doors that fail to close let predators in. A current-sensing or beam-break door eliminates both failure modes.
Are smart chicken coops a fire risk?
Smart coop fires almost always trace to heat lamps (not the smart automation). Replacing a heat lamp with a flat-panel radiant heater on a thermostatic outlet eliminates the top fire cause. The 12V automation loop itself runs at safe low voltage with proper fusing.
How do I prevent an automatic door from injuring a chicken?
Choose a door with current-sensing motor that reverses on obstruction, set close time 20–30 minutes after sunset (not at sunset), and verify operation monthly with a wooden dowel test. Avoid simple timer-only doors that have no obstruction detection.
Do I need a smoke detector in my chicken coop?
Yes if you use any heating device — heat lamp, radiant panel, or heated waterer. A $20 battery-powered detector mounted high in the coop catches early fire signals. Many smart smoke detectors integrate with home automation for instant SMS alerts.
What temperature should trigger a heat alarm in a chicken coop?
Set the high-temp alarm at 90°F (32°C). Chickens tolerate up to 95°F before egg laying drops, and heat stroke risk starts at 105°F. The 90°F threshold gives you 1–2 hours to respond before damage starts. Set ventilation fans to start at 85°F.
Should every smart coop circuit be on a GFCI?
Yes — required by NEC code for any 110V outlet in damp/wet locations, and basic safety for the chickens and you. Use a GFCI breaker at the house panel plus a GFCI outlet at the coop for redundant protection. Test quarterly.
Related Articles
Related Guides
Water-Level and Flow Sensors: Knowing the Waterer Is Empty Before They Do
A coop water-level sensor tells you the drinker is going dry — or freezing solid — before the flock does,…
Ammonia Sensors for the Coop: Catching Air Problems Before You Smell Them
An ammonia sensor belongs at the birds’ breathing height, close to the litter where the gas is generated, because that…

Node-RED vs Home Assistant Automations for the Coop: When to Use Which
Use native Home Assistant automations for the coop’s simple, safety-critical rules — the sunrise door, the freeze-watch waterer — and…