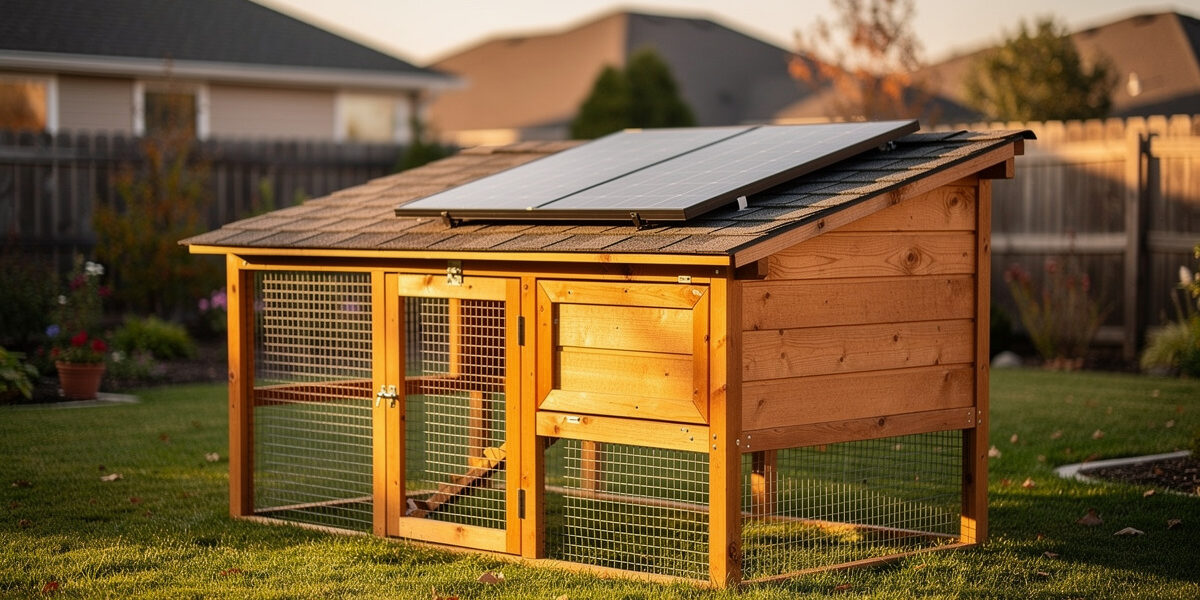
An off grid smart chicken coop can run a 12V automation stack — auto door, camera, LED light, sensor hub — on roughly 150 Wh per day, fully covered by a 100–200W solar panel and a 100Ah lithium battery for $450–$900. The trick is sizing for your worst week, not your best.
This guide walks through the actual electrical math, component selection, and installation sequence backyard keepers use to run a smart coop with no grid hookup. I run my own coop’s door, cameras, and freeze-watch waterer automation off the same kind of 12V stack this guide sizes — mine happens to be grid-tied through Home Assistant, but the load math is identical whether the source is a wall outlet or a panel on the roof. Everything below assumes you already understand why automation matters — for the broader build picture, see our complete smart chicken coop guide.
What Counts as “Off-Grid” for a Smart Coop
Off-grid in this context means the coop’s automation runs entirely on solar generation and battery storage with zero connection to your house electrical panel. A grid-tied coop with a battery backup is a different setup — that one is covered separately in our complete smart chicken coop guide under power planning.
Most off-grid coops fall into one of three categories:
- Pure solar — panel + charge controller + battery + 12V loads. No inverter, no AC. Cheapest and most reliable.
- Solar + small inverter — adds a 300–600W pure sine inverter to run AC accessories like a heated waterer or 110V camera. Adds $80–$150 and ~10% conversion losses.
- Solar + generator backup — adds a small inverter generator for multi-day cloudy stretches in northern climates. Rarely needed if the battery bank is sized correctly.
The pure 12V approach is the right choice for 80% of backyard setups. Most modern smart coop hardware — automatic doors, ESP32 sensor hubs, PoE-free 12V cameras, LED strips — is designed for it.
Daily Power Budget: How Much Does a Smart Coop Actually Draw?
Before you buy a single panel, total your daily watt-hour load. Underbuilding here causes 90% of off-grid failures. Here is what a typical smart coop pulls in 24 hours:
| Component | Power Draw | Hours/Day | Daily Wh |
|---|---|---|---|
| Automatic door (cycle + standby) | 5–10W active, 0.05W standby | 2 cycles × 30s | ~3 Wh |
| WiFi camera (1080p, 12V) | 3–5W | 24 (always on) | 72–120 Wh |
| LED interior light strip | 5W | 2–4 (winter laying assist) | 10–20 Wh |
| Temperature/humidity sensor hub | 0.5–1W | 24 | 12–24 Wh |
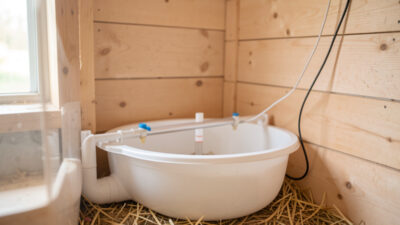
| Heated waterer base (optional, 12V) | 40W | 4 (winter only) | 160 Wh winter |
| 4G/LTE cellular modem (optional) | 3–8W | 24 | 72–192 Wh |
| Typical 3-season total | 100–170 Wh | ||
| Worst-case winter w/ heated waterer + cell | 330–520 Wh |
The big swing is the heated waterer. If you skip it (use a deep insulated waterer or a manual swap routine in freezing weather), your off-grid sizing drops by half. The same is true for cellular modems — coops within home WiFi range can use the home router for free.
Worst-Week Sizing, Not Annual Average
Solar production commonly runs 30–70% lower in December and January than in summer, and the drop gets steeper the further north you are — a panel that comfortably covers a 150 Wh/day load in July can fall short by late December at 45° N latitude, which is exactly why seasonal solar-output data and worst-month sizing matter more for a coop running 24/7/365 than for a system you can idle. Always size to your local winter daily minimum, not the annual average. A free solar-production calculator (search “PVWatts”) gives monthly estimates by zip code in under two minutes — run your own numbers before you buy a panel, because local cloud cover and roof angle move the answer more than the general rule does.
Picking the Solar Panel
For a 3-season smart coop with a 150 Wh/day load, a single 100W monocrystalline panel is the right size in most of the lower 48. It produces 350–400 Wh on a sunny summer day, 100–150 Wh on a bright winter day, and 30–60 Wh on overcast days. Combined with a properly sized battery bank, that covers two-day cloudy stretches.
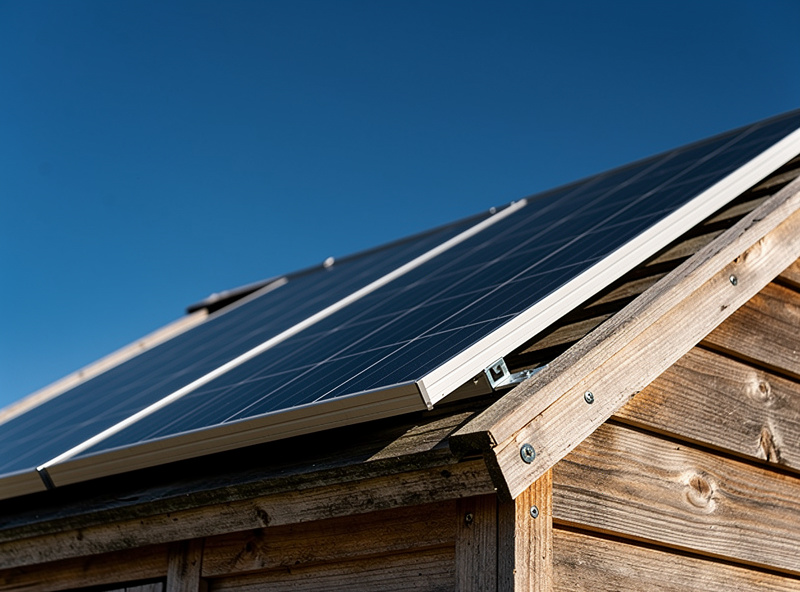
If you live north of 42° latitude or run a heated waterer in winter, jump to a 200W panel ($120–$180). The marginal cost is small and winter generation roughly doubles. Two 100W panels in parallel are easier to mount on most coop roofs than a single 200W panel.
Mounting matters as much as wattage. South-facing at a tilt equal to your latitude plus 15° in winter (or panel-mount adjustable brackets) maximizes cold-month output. Avoid any roof location that gets shaded by trees between 10am and 2pm — even partial shade on one cell can drop output 40%.
If you are building from scratch on a tight budget and considering scrap solar panels or salvage components, work through our DIY automation under $200 guide first — the parts overlap with this off-grid stack and you can reuse most of them.
Sizing the Battery Bank
Battery capacity should cover 2–3 days of load with no solar input. For a 150 Wh/day budget, that means 300–450 Wh of usable storage. In 12V terms:
- Lithium LiFePO4 (recommended): a 50Ah/12V battery holds 600 Wh total, and at a safe 80% depth of discharge that is ~480 Wh usable — enough to clear the 300–450 Wh, 2–3 day target above. $180–$280.
- AGM lead-acid (budget): 100Ah/12V holds 1,200 Wh total, but AGM should only be run to 50% DoD, so usable capacity is the same ~600 Wh — you need double the rated Ah of AGM to match a given LiFePO4’s usable storage. $130–$190.
LiFePO4 wins for off-grid coops in three ways. First, it cycles 3,000+ times to 80% DoD versus 400–600 cycles for AGM — your battery lasts a decade instead of two years. Second, it holds capacity in the cold better than lead-acid, which loses 40–50% of usable capacity near freezing. Third, it weighs a third as much, which matters when you mount it inside the coop or in a small outdoor enclosure. The one thing every LiFePO4 pack needs that lead-acid does not: never charge it below freezing. Below 32°F the charge current can plate metallic lithium onto the anode, which is permanent capacity loss, not a recoverable state — manufacturer guidance on cold-weather lithium charging covers why, and it is the reason the cold-weather protection section below matters as much as the panel and battery sizing.
Skip cheap “marine deep cycle” batteries. They are starter batteries with deep-cycle marketing and die in 12–18 months under daily off-grid duty.
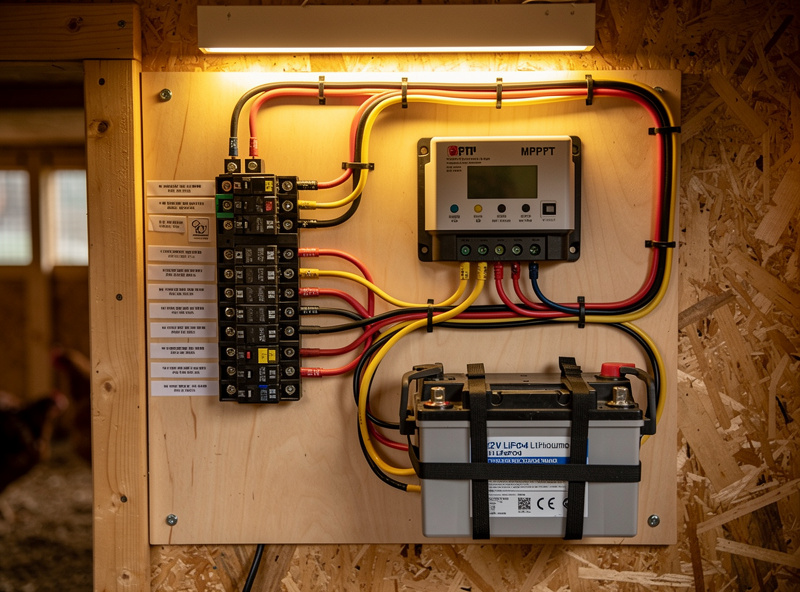
The Charge Controller
The charge controller sits between the panel and the battery, regulating voltage and preventing overcharge. There are two types:
- PWM ($15–$30) — fine for a single 100W panel matched to a 12V battery. Cheap, simple, 70–75% efficient.
- MPPT ($45–$120) — required for higher-voltage panels or anything over 150W. 92–97% efficient, especially in cold weather and low light. Worth it for any panel over 150W.
For a 100W system, a 20A PWM controller is plenty. For 200W or more, jump to a 20A MPPT — the extra winter generation pays for the controller in one cold season. Make sure the controller has a low-voltage disconnect (LVD) feature to protect lithium batteries from over-discharge.
Wiring the System
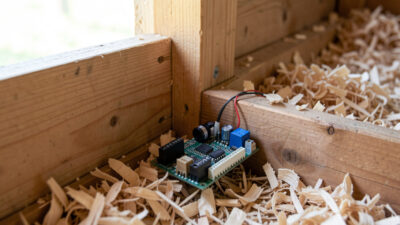
Off-grid 12V wiring is straightforward but unforgiving — undersized wire causes voltage drop that kills sensitive electronics. Three rules cover most installations:
- Panel to controller: 10 AWG for runs under 15 feet at 100W. 8 AWG over 15 feet or for 200W panels.
- Controller to battery: 8 AWG, kept under 4 feet. Use ring terminals and proper crimps, not wire nuts.
- Battery to load distribution: 10 AWG to a fused DC distribution block, then 14–16 AWG to individual devices.
Every wire run from the battery needs a fuse sized to the wire’s ampacity. A 100Ah battery can deliver enough current to start a fire if a wire shorts. Use a 30A fuse on the controller-to-battery line and 5–10A fuses on each load circuit. I treat every crimp on a 12V coop circuit the same way I treat a weld on the run frame — it either holds under vibration and weather or it is a failure waiting for a windy night, so I use heat-shrink ring terminals and a proper ratcheting crimper, not the pliers-and-hope method. For more on layout, conduit, and where to run the wiring during construction, our complete smart chicken coop guide covers the full electrical plan.
Cold Weather Protection
Lithium batteries cannot be charged below 32°F (0°C) without permanent damage. In zones 5 and colder, this is the single biggest off-grid failure point. Two solutions work:
- Battery with built-in heater — most quality LiFePO4 batteries above $250 include a low-temp cutoff and heating pad that draws 5–10W when needed. Pulls from the battery itself, so factor it into your daily Wh budget for winter.
- Insulated battery enclosure inside the coop — a well-insulated, properly ventilated coop with a normal-size flock typically runs 10–20°F above outside air on body heat alone, more with a bigger flock and tighter insulation. Mounting the battery on the inner coop wall (not the floor, where cold air pools) keeps it above freezing in most zone 5–6 setups, though it is not a guarantee in a hard cold snap — that is what the heated battery pad below is for.
For zone 4 and colder, do both. The combined approach is more reliable than either alone.
Off-Grid Cost Breakdown
| Tier | Components | Total Cost | Best For |
|---|---|---|---|
| Minimum viable | 100W panel + 50Ah AGM + 20A PWM + wiring | $220–$320 | Mild climate, door + sensor only |
| Standard 3-season | 100W panel + 50Ah LiFePO4 + 20A PWM + fused distribution | $420–$580 | Most US backyards, full smart stack |
| Year-round zone 5–6 | 200W panel + 100Ah LiFePO4 (heated) + 20A MPPT + insulated enclosure | $700–$1,050 | Cold winters, heated waterer included |
| Remote homestead | 400W panel + 200Ah LiFePO4 + 30A MPPT + 600W inverter + cellular modem | $1,200–$1,800 | Off-property locations, AC accessories, no WiFi |
The standard tier is the sweet spot. It runs a full smart stack — door, camera, LED, sensors — with comfortable headroom for cloudy days and lasts 8–10 years before any component needs replacement.

Common Off-Grid Mistakes
Five issues cause most off-grid coop failures in the first 12 months:
- Sizing for summer, not winter. A panel that runs the coop fine in July fails in December. Always check December production estimates before buying.
- Skipping the fuse. A 100Ah battery delivers 1,000+ amps into a dead short. Fuse every circuit.
- Mounting the battery on the coop floor. Cold air pools low. Mount batteries on inner walls 12+ inches off the floor — I learned this one on a sensor-hub battery, not a solar bank, but the same cold-floor logic cost me a dead pack one January before I moved it up the wall.
- Using “solar” extension cables to a far-away panel. Voltage drop kills production. Keep panel-to-controller runs short and the wire fat.
- Trusting the marketing wattage on cheap panels. Generic Amazon panels often deliver 60–70% of rated output. Stick to known brands like Renogy, Newpowa, or HQST.
For a deeper look at the broader pitfalls — across automation, climate, and predator design — see our forthcoming smart coop mistakes guide. For battery-specific failover when the grid is your primary power but you want resilience, see our forthcoming battery backup guide. Pure off-grid keepers should also read the related solar chicken coop heater guide for combining heating with the same panel array.
When Off-Grid Makes Sense (and When It Does Not)
Off-grid is the right choice when running a buried conduit from your house panel costs more than $400, when the coop is more than 100 feet from an outlet, when you want resilience against grid outages, or when the coop is on a separate property without service.
It is the wrong choice when the coop is 20 feet from a garage outlet, when you want to run a 1,500W heat lamp in winter, or when you only have one sunny corner of the yard and it is taken by a vegetable garden. In those cases, a grid connection with a small battery backup gives you better reliability for less money — covered in our main smart coop build guide.
Frequently Asked Questions
For the full panel-sizing math by US climate zone, see the solar panel chicken coop sizing guide.
How many watts of solar do I need for a smart chicken coop?
For a typical smart coop running an automatic door, WiFi camera, LED light, and sensor hub, a single 100W monocrystalline panel covers the 100–170 Wh daily load in most US climates. Add a second 100W panel if you run a heated waterer in winter or live north of 42 degrees latitude.
What size battery do I need for an off-grid coop?
A 50Ah LiFePO4 lithium battery holds 600 Wh total, and at a safe 80 percent depth of discharge that is about 480 Wh usable — enough to cover 2-3 cloudy days on a standard 150 Wh daily load. Step up to 100Ah if you add a heated waterer or want a full week of reserve in northern climates.
Can a chicken coop be fully off-grid in winter?
Yes, in zones 7 and warmer with a 100W panel and 50Ah LiFePO4 battery. In zones 5-6 you need 200W of solar and 100Ah of storage to handle short days. Below zone 5, plan on 400W of panels and a heated lithium battery to maintain reliable charging at sub-zero temperatures.
Is it cheaper to go off-grid or run a buried power line?
Off-grid wins when the coop is more than 100 feet from your house panel. A standard off-grid setup runs $420–$580. Trenching, conduit, wire, and a permitted 20-amp circuit typically costs $600–$1,500 for runs over 50 feet. Under 50 feet, grid usually wins.
Will an off-grid solar coop work in cloudy climates?
Yes, but oversize the panels by 50–75% and the battery bank by 100% compared to sunny-climate sizing. Pacific Northwest and Great Lakes coops typically need 200W of solar and 100Ah of storage to handle 5–7 day cloudy stretches reliably.
Do I need an inverter for an off-grid smart coop?
No, if all your devices are 12V DC — modern automatic doors, sensor hubs, and 12V cameras run directly off the battery. Only add a 300–600W pure sine inverter if you need to run a 110V heated waterer or other AC-only accessory, and accept the 10% conversion loss.
Related Articles
Related Guides
Water-Level and Flow Sensors: Knowing the Waterer Is Empty Before They Do
A coop water-level sensor tells you the drinker is going dry — or freezing solid — before the flock does,…
Ammonia Sensors for the Coop: Catching Air Problems Before You Smell Them
An ammonia sensor belongs at the birds’ breathing height, close to the litter where the gas is generated, because that…

Node-RED vs Home Assistant Automations for the Coop: When to Use Which
Use native Home Assistant automations for the coop’s simple, safety-critical rules — the sunrise door, the freeze-watch waterer — and…