
Good smart chicken coop plans get worked out on paper before any lumber is cut. The planning phase typically takes 4–8 hours but saves 20+ hours of expensive rework — the difference between a coop that fits its site and budget on day one and a coop you have to retrofit twice. The five planning steps that matter: site selection, orientation and sun mapping, automation pre-wiring strategy, code/permit research, and a sequenced build schedule.
This guide walks through each step in the right order, with the decisions that lock in once construction starts. I skipped a proper wiring chase on my first build and paid for it with a weekend of fishing cable through finished walls — everything below is the planning session I actually run now before framing starts. For overall context, see our complete smart chicken coop guide. For square-footage math, start with our smart chicken coop size guide.
Step 1: Site Selection
The location of the coop affects every other decision. Before any other planning:
- Distance from house — under 50 ft is ideal for grid power and WiFi. Beyond 100 ft, plan for off-grid or cellular.
- Drainage — never a low spot. The coop should sit on the highest point of the chosen area. Standing water near the coop kills birds and rots foundations.
- Tree cover — partial shade is good (summer cooling). Heavy shade is bad (auto-door light sensors, solar panels, mold).
- Access path — you will walk this path 200+ times per year, sometimes carrying 40 lb of feed. Make it short and graded.
- Neighbor proximity — most jurisdictions require 10–25 ft setbacks from property lines. Verify before siting.
- Predator pressure — coops near woods or open fields face higher predator load than coops in fenced suburban yards.
Walk the candidate locations at three times of day before deciding: morning (sun exposure), midday (shade, hot spots), evening (mosquitoes, neighbor noise). The right site usually reveals itself by the third walkthrough.
Step 2: Orientation and Sun Mapping
Coop orientation drives auto-door reliability, ventilation strategy, and solar panel viability:
| Door Faces | Sun Exposure | Auto-Door Reliability | Notes |
|---|---|---|---|
| East / Southeast | Morning sun | Excellent | Best choice — dawn light triggers door opening cleanly |
| South | Full midday sun | Excellent | Good for solar panels; can overheat in summer |
| West / Southwest | Afternoon sun | Good | Triggers door close cleanly; afternoon heat issue |
| North | Minimal direct sun | Marginal | Light sensors can mis-trigger; avoid for auto-door coops |
For most US backyards, east-facing doors with the long axis running east-west deliver the best year-round results. Solar panels then mount on the south-facing roof slope, giving them maximum production without conflicting with the door. My own run faces east for exactly this reason — the door’s light sensor has never once mis-triggered on a clear morning since I sited it that way.
Use a free app like Sun Surveyor or PhotoPills to map sun angles at your specific site. The 5-minute investment prevents an “I planned for east sun but the maple tree blocks it from October–April” mistake.
Step 3: Pre-Wiring Strategy
The single biggest difference between cheap-to-build smart coops and expensive ones is whether the wiring path was planned during framing or retrofitted afterward.
Before framing starts, decide:
- Where the AC feed enters the coop. Pick one specific entry point with a strain relief bushing planned. Mark it on the framing.
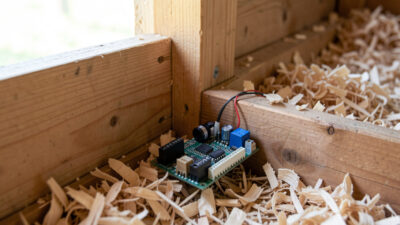
- Where the 12V automation zone goes. 2×3 ft area inside the people door, chest height. Reinforce the wall there for mounting.
- Where each device mounts. Auto door (top of pop door), camera (high corner), sensors (mid-height shaded wall), heated waterer base (below or beside waterer), LED strip (ceiling).
- Cable runs from automation zone to each device. Aim for the shortest, straightest path. Avoid running cables across nesting boxes (chickens peck them) or floor (rodents chew them).
Run conduit or chase channels in the framing. Mark every cable run on a sketch. Include extra capacity — pull strings or empty conduit to support future expansion. Wiring details in our smart chicken coop wiring guide.
Step 4: Code and Permit Research
Two layers of regulation affect smart coops:
Local Zoning and Backyard Chicken Ordinances
- Some cities limit flock size (often 4–6 birds residential)
- Most prohibit roosters (or limit them to specific zoning)
- Setbacks from property lines: typically 10–25 ft
- Setbacks from neighbor dwellings: sometimes 50+ ft
- Coop structure permits: required in some jurisdictions for any structure over a certain size (often 100–200 sq ft)
Check your municipal code before siting — flock limits, rooster bans, and setback distances are set city by city and even neighborhood by neighborhood, not by any single state standard (the BackYard Chickens community’s rundown on navigating local ordinances is a good starting map of what to expect). The local Cooperative Extension office or chickenkeeping subreddit usually has the actual interpretation, not just the letter of the law.
Electrical Code
- NEC requires GFCI on any 110V outlet in damp/wet locations
- New branch circuits typically require a permit + inspection ($40–$120 in fees)
- Direct-burial UF cable needs 24 inches of cover in a typical yard run; PVC or EMT conduit needs 18 inches (NEC 300.5 burial-depth breakdown covers the full table, including the reduced-depth GFCI exception)
- Outdoor outlets need in-use covers (the “bubble” type)
If you are pulling a new circuit, build the permit timeline into your build schedule — inspections take 1–3 weeks to schedule in most jurisdictions. The full safety stack is covered in our smart chicken coop safety guide.
Step 5: Sequenced Build Schedule
The order of construction affects how easy each step is. Right sequence:
- Site prep (1–2 days): Level, gravel base, mark final footprint.
- Run buried conduit (1 day): While the trench is open. Doing this later means re-trenching.
- Pour foundation (1 day if concrete; same-day if blocks/skids).
- Frame walls (1–2 days): Run interior wiring chases and mounting blocks during framing, before sheathing.
- Sheath and roof (1–2 days).
- Install windows, doors, vents (1 day).
- Predator-proofing (1 day): Hardware cloth on every opening, buried apron.
- Run final wiring + install electrical box (half day).
- Install automation hardware (1 day): Auto door, camera, sensors, distribution block.
- Software setup and calibration (half day).
- Move chickens in (after structure has aired out 24–48 hours).
Total: 8–11 build days for a typical 4×8 smart coop, spread across 3–4 weekends. Skipping the conduit step or the in-frame wiring chase adds 4–6 hours of rework later. Doing it right takes a couple of extra hours upfront.
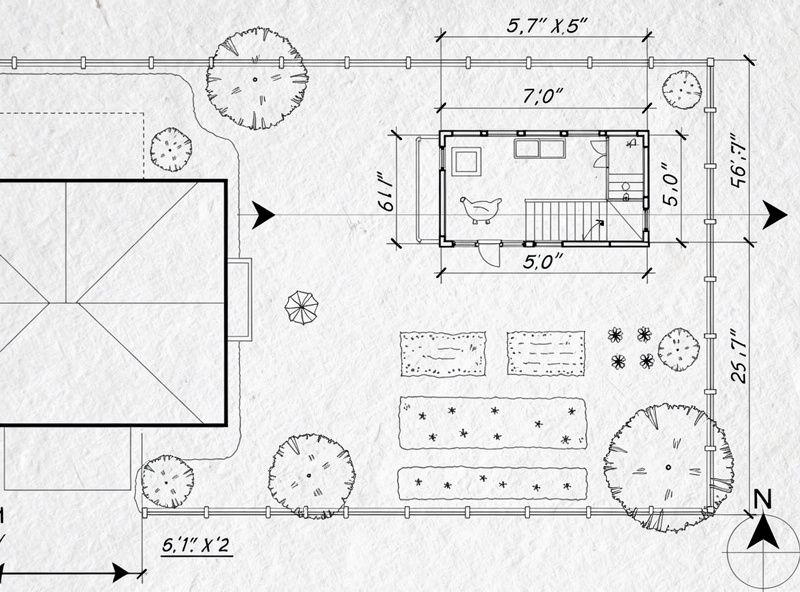
What to Sketch Before Cutting Lumber
The minimum planning sketch — done on paper or any drawing app — should include:
- Site plan showing coop footprint, run footprint, distance to house, distance to property lines
- Floor plan of coop with roost, nesting box, feeder/waterer, and automation zone marked
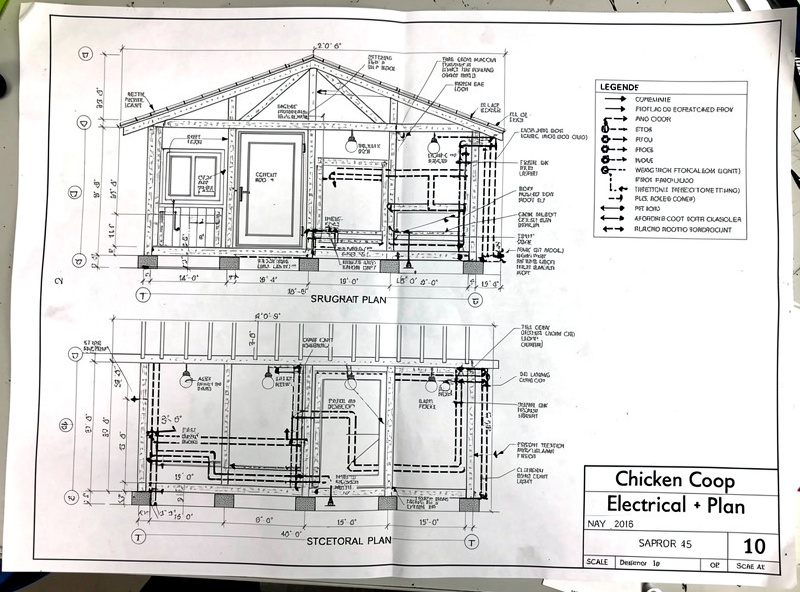
- Wall elevation showing door height, vent placement, camera mount position
- Electrical diagram showing AC entry, 12V distribution, every device’s cable run
- Materials list with quantities and current prices
You can do this on a napkin or in a CAD app. The point is having one source of truth that captures your decisions. The number of mid-build “wait, where was I going to put the camera?” moments drops from a dozen to zero.
Common Planning Mistakes
- Skipping the sun mapping. Builders pick a “nice spot” without checking sun exposure. Three months later the auto-door light sensor fires inconsistently because the spot is shaded by a maple they forgot about.
- No clear automation zone. Wires end up running across the floor because no one decided where the distribution block lives. Rodent damage follows.
- Forgetting the access path. Coop is sited 80 ft from the house but the path goes uphill through tall grass. Daily egg collection becomes a chore people skip.
- Building before checking zoning. 4×8 is fine in most cities; 8×10 sometimes triggers a structure permit. Get the answer before framing.
- No future expansion thought. Sized exactly to today’s flock, no room for adding birds. Two years later, full rebuild.
Materials Planning Checklist
| Category | Order Lead Time | Plan |
|---|---|---|
| Lumber + sheathing | 0 days (local) | Order 2–3 days before framing day |
| Hardware cloth + predator-proofing | 0–2 days | Have on site before walls go up |
| Roofing + flashing | 0–2 days | Match to climate; metal for snow regions |
| Auto door + camera + sensors | 3–7 days (online) | Order 2 weeks before install |
| Electrical (cable, conduit, GFCI) | 0 days | Order with the lumber run |
| Bedding (initial) | 0 days | Buy after coop is dry |
The most common delay is automation hardware. Order it early — 2 weeks before you plan to install — to avoid the “everything else is done, waiting on the auto door” scenario.

The 4-Hour Planning Session
One concentrated planning session, ideally 1–2 weeks before you start building:
- Site walk (45 min): Walk the candidate locations, take photos, note sun angles and obstacles.
- Sketch the floor plan (30 min): Layout, automation zone, electrical entry point.
- Wiring diagram (45 min): Map every cable from distribution to device.
- Permit and code check (60 min): Call building department, verify setbacks and permit thresholds.
- Materials list and order (45 min): Itemize, price, identify long-lead items.
- Schedule (15 min): Lay out the build days across your weekends.
That’s 4 hours. The payoff is a clean build with no surprise rework. Most builders find it the highest-ROI time they spend on the entire project.
Frequently Asked Questions
Do I need a permit to build a smart chicken coop?
Most jurisdictions require permits for any new electrical branch circuit ($40–$120 in fees) and some require structural permits for coops over 100–200 sq ft. Backyard chicken ordinances also vary widely by city. Check your municipal code and local Cooperative Extension office before siting.
Which direction should a smart chicken coop face?
East or southeast is the best orientation for the door — morning light triggers automatic door opening reliably and provides early laying-stimulating sun. Avoid north-facing doors, where light sensors mis-trigger in winter. Solar panels mount on the south-facing roof slope.
How long does it take to plan a smart chicken coop?
A focused 4-hour planning session covers site walk, floor plan, wiring diagram, permit check, materials list, and schedule. This investment typically prevents 20+ hours of rework during construction. Most builders complete planning 1–2 weeks before lifting the first board.
What should I draw before building a smart chicken coop?
Five sketches: site plan with property setbacks, floor plan with automation zone marked, wall elevation showing device heights, electrical diagram with cable runs, and materials list. They can be hand-drawn on paper — the goal is one source of truth for your decisions.
Should the coop be close to my house or far away?
Under 50 feet is ideal for grid power, WiFi reach, and short walking distance for daily care. Beyond 100 feet, plan for off-grid solar power and either an outdoor mesh node or cellular backup. Most backyard keepers benefit from siting closer rather than farther.
How far in advance should I order automation hardware?
Order auto doors, cameras, and sensors 2 weeks before installation. Most ship in 3–7 days but supply chain hiccups happen. The most common build delay is everything else being done while waiting on automation hardware. Lumber and electrical can be sourced same-week.
Related Articles
Related Guides
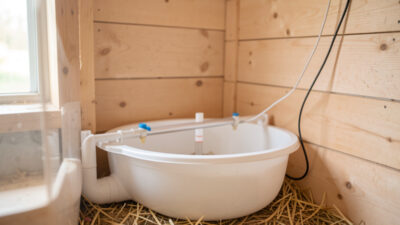
Water-Level and Flow Sensors: Knowing the Waterer Is Empty Before They Do
A coop water-level sensor tells you the drinker is going dry — or freezing solid — before the flock does,…
Ammonia Sensors for the Coop: Catching Air Problems Before You Smell Them
An ammonia sensor belongs at the birds’ breathing height, close to the litter where the gas is generated, because that…

Node-RED vs Home Assistant Automations for the Coop: When to Use Which
Use native Home Assistant automations for the coop’s simple, safety-critical rules — the sunrise door, the freeze-watch waterer — and…