
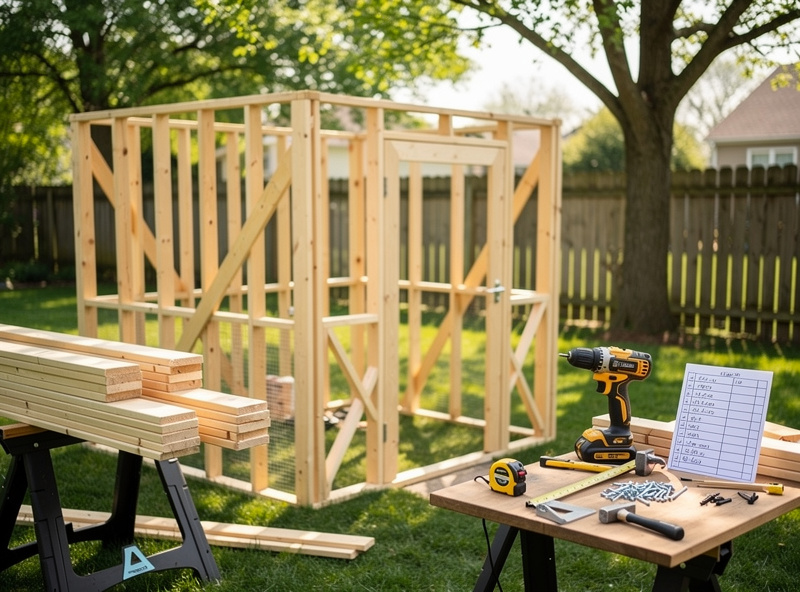
Building your own coop with DIY chicken coop plans saves $400–$1,500 versus prefab equivalents and produces a longer-lasting, better-fitted structure for $300–$900 in materials. The right plan for you depends on flock size, skill level, and how much time you can commit. This guide covers 12 free design paths organized by skill — from a $150 weekend pallet build to a 3-weekend walk-in barn-style coop — plus the build sequence, tool requirements, and common-mistake fixes that separate a 15-year coop from a 3-year one.
Whether you are building from scratch or upgrading an existing structure, the planning principles in our smart chicken coop planning guide apply equally to manual coops. For overall flock-count math, start with our chicken coop size guide.
Why DIY Beats Prefab
The case for DIY over prefab is straightforward:
- Cost. A 4×8 DIY coop runs $300–$600 in materials. The equivalent prefab from any major brand costs $900–$1,800.
- Lifespan. DIY built with proper materials lasts 15–25 years. Most prefab structures last 8–15 years.
- Customization. Match coop size, layout, ventilation, and aesthetics to your specific yard. Prefab is dimensionally fixed.
- Predator-proofing control. You control wire size, foundation, and joint integrity. Prefab often ships with chicken wire and weak latches.
- Repair and modification. A wood DIY coop can be repaired indefinitely with standard lumber. Plastic prefab often becomes throwaway when one panel cracks.
The cost of DIY is time. A simple 4×4 coop takes 12–18 hours; a walk-in 8×8 with run takes 30–50 hours. If your time is more valuable than the materials savings, our best chicken coops 2026 buyers guide covers the prefab path.
The 12 DIY Coop Plans by Skill Level
| Skill Level | Plan | Materials | Time | Capacity |
|---|---|---|---|---|
| Beginner | Pallet Coop (recycled materials) | $80–$180 | 10–14 hrs | 3–4 birds |
| Beginner | 4×4 Basic Coop (new lumber) | $280–$420 | 12–18 hrs | 4 birds |
| Beginner | Garden Shed Conversion | $200–$500 (existing shed) | 10–16 hrs | 4–8 birds |
| Intermediate | 4×8 Standard Coop | $420–$640 | 18–28 hrs | 6 birds |
| Intermediate | A-Frame Tractor | $220–$380 | 14–22 hrs | 3–6 birds |
| Intermediate | Hoop Coop (cattle panel) | $300–$500 | 14–20 hrs | 6–10 birds |
| Intermediate | Repurposed Playhouse | $180–$420 (existing playhouse) | 12–18 hrs | 3–6 birds |
| Intermediate | 4×8 Walk-In with Run | $580–$880 | 24–36 hrs | 4–6 birds + run |
| Advanced | 6×8 Walk-In Coop | $700–$1,100 | 32–48 hrs | 8 birds |
| Advanced | 8×8 Walk-In Coop | $900–$1,400 | 40–60 hrs | 10–12 birds |
| Advanced | Barn-Style 8×10 with Loft | $1,200–$1,800 | 50–80 hrs | 12–15 birds |
| Advanced | Insulated Cold-Climate 8×10 | $1,400–$2,200 | 50–80 hrs | 10–12 birds, zone 3-4 |
The intermediate tier hits the realistic sweet spot for most backyard keepers — enough capacity, manageable build time, and resulting coop quality that lasts 20+ years.
Tool Requirements by Plan Tier
| Plan Tier | Required Tools | Tool Cost If Starting From Zero |
|---|---|---|
| Beginner (Pallet, 4×4) | Hammer, hand saw, drill, measuring tape, square | $80–$140 |
| Intermediate (4×8, A-Frame, Hoop) | Add: circular saw, level, miter box, framing nailer (optional) | $180–$320 |
| Advanced (Walk-In, Barn-Style) | Add: table saw, framing nailer, jigsaw, compound miter saw | $420–$680 |
If you do not own basic tools, a beginner build pays for the tool kit while delivering a usable coop. By your second build, the tools are paid for. This is one reason DIY pencils out cheaper over time even at “amateur” hourly rates.
Plan 1: The Pallet Coop (Cheapest)
Free pallets + new hardware cloth + 1/2 sheet of plywood for floor and roof. The cheapest functional coop, ideal for testing whether you want chickens before committing to a permanent structure.
- Materials: 8–10 free pallets (look on Craigslist or local businesses), 25 sq ft of 1/2″ hardware cloth, half sheet of plywood, 4×4 corner posts, screws, hinges
- Cost: $80–$180 in new materials + free pallets
- Time: 10–14 hours including pallet disassembly
- Best for: Tight budgets, first-time chicken keepers testing the waters
Pallet coops have one consistent failure mode: pallets are not weather-treated, so the wood breaks down in 4–7 years. Plan to rebuild or upgrade by year 5 — but for under $200 entry, that is fine.
Plan 2: The 4×4 Basic Coop
Standard 4×4 frame with 2×4 lumber, T1-11 plywood siding, asphalt shingle roof, hardware cloth on every opening. This is the first “real” coop most DIY builders make. It accommodates 4 birds with proper sizing and lasts 15–20 years with periodic repainting.
- Materials: 2×4 framing, T1-11 plywood, 1/2″ hardware cloth, asphalt shingles, hinges, latches, screws
- Cost: $280–$420
- Time: 12–18 hours over one weekend
- Best for: First-time builders with basic tools
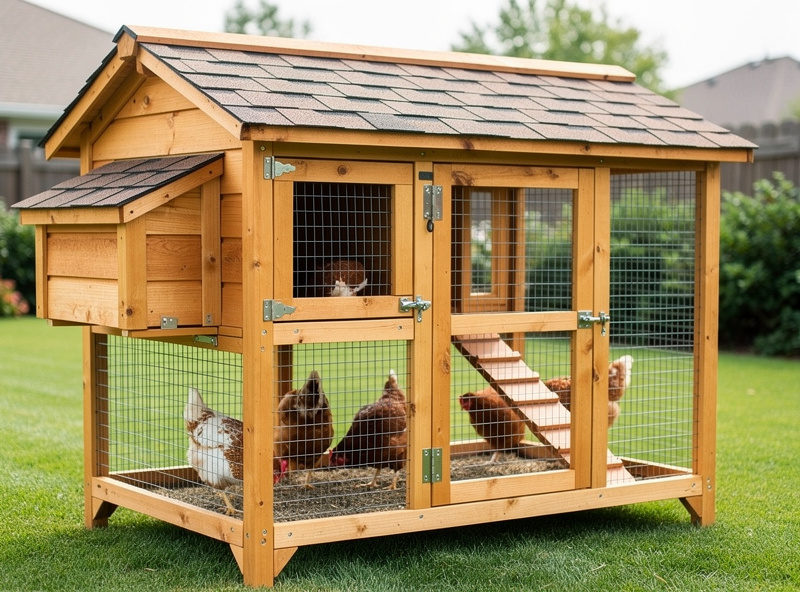
Plan 3: 4×8 Standard Coop (Most Popular)
The realistic recommendation for most backyard keepers: 32 sq ft inside, comfortable capacity for 6 birds, fits a standard 4×8 lumber dimension without waste. This is the plan we recommend for most readers.
- Materials: 2×4 framing, T1-11 or LP SmartSide siding, 1/2″ hardware cloth, metal or asphalt roof, two nesting boxes, ventilation gable vents
- Cost: $420–$640
- Time: 18–28 hours over 2 weekends
- Best for: Standard 4–8 bird flocks, intermediate builders
Pair this with a 6×12 or 8×12 run from our chicken run guide for a complete setup.
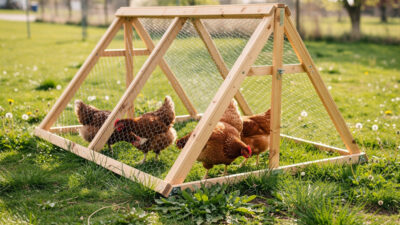
Plan 4: A-Frame Chicken Tractor
Triangular profile with a coop section at one end and an open run section at the other, mounted on skids or wheels for periodic relocation. Great for rotational pasture systems.
- Cost: $220–$380
- Time: 14–22 hours
- Best for: Smaller flocks (3–6) on properties with usable pasture
For more on chicken tractor design and operation, see our chicken tractor guide.
Plan 5: Hoop Coop (Cattle Panel Construction)
Two 16-ft cattle panels arched between treated posts to form a curved roof, with hardware cloth lining. The curved profile sheds rain and snow naturally and provides walk-in interior height for a 6×12 or larger size.
- Cost: $300–$500
- Time: 14–20 hours
- Best for: Walk-in capability at low cost, snow regions where the curved roof helps
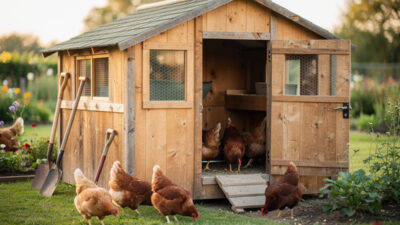
Plan 6: Garden Shed Conversion
An existing 6×8 or 8×10 garden shed converted to chicken use by adding ventilation, nesting boxes, roost bars, and a pop door. Often the fastest path to a quality coop if you already own a shed.
- Materials: Hardware cloth for vents, nesting box lumber, roost bar, pop door hardware, hinges
- Cost: $200–$500 (in addition to existing shed value)
- Time: 10–16 hours
- Best for: Existing shed owners, quick deployment, larger coops on a budget
Plan 7: 6×8 Walk-In Coop
The smallest size that comfortably supports walk-in human access. 48 sq ft inside, 8 birds capacity. Walk-in coops solve the “crawling on hands and knees to clean” problem that smaller coops create.
- Cost: $700–$1,100
- Time: 32–48 hours over 3 weekends
- Best for: Backyard keepers who value maintenance ease, 8-bird flocks
Plan 8: 8×8 or 8×10 Walk-In
The “build for life” option. 64–80 sq ft inside, 10–12 birds capacity, full walk-in height, room for an automation zone, integrated nesting boxes with external collection. Lasts 25+ years.
- Cost: $900–$1,400
- Time: 40–60 hours over 4–5 weekends
- Best for: Long-term commitment, larger flocks, properties where the coop is a permanent feature
Match this with a 12×16 large run from our large chicken run guide.
Plan 9: Barn-Style Coop with Loft
Tall gambrel-roof design with an upper loft for hay storage or bedding storage above the chicken-living level. Aesthetically matches farm settings and provides bonus storage.
- Cost: $1,200–$1,800
- Time: 50–80 hours
- Best for: Larger properties, builders who want storage integrated with the coop
Plan 10: Insulated Cold-Climate Coop
Standard 8×10 walls with 2×6 framing (instead of 2×4) for thicker insulation, R-13 fiberglass batts, vapor barrier, and double-paned windows. For zones 3–4 where supplemental heating gets expensive.
- Cost: $1,400–$2,200
- Time: 50–80 hours
- Best for: Cold climates, larger flocks, year-round laying with minimal heating

The Universal Build Sequence
Whichever plan you choose, the order of construction stays the same:
- Site prep + foundation: Level the ground, lay concrete blocks, skids, or pour a small slab.
- Floor framing + subfloor: 2×4 floor joists at 16″ on center; plywood subfloor.
- Wall framing: Build walls flat on the ground, then stand them up on the floor.
- Roof framing: Rafters or trusses, then roof sheathing.
- Sheathing and siding: Wrap walls in plywood or T1-11; install windows and pop door.
- Roofing: Underlayment, then asphalt shingles or metal panels.
- Predator-proofing: Hardware cloth on every opening; seal all gaps.
- Interior fit-out: Roost bars, nesting boxes, feeders, waterers.
- Exterior finish: Paint or stain; install latches and hardware.
- Run attachment: Build or attach the run with proper joint sealing.
Most DIY mistakes come from skipping or reversing steps. Run framing before floor sheathing; predator-proof before painting; do interior fit-out last so you have unobstructed access during the build.
Material Standards for Lasting Builds
| Component | Minimum Standard | Better Standard |
|---|---|---|
| Framing | Pressure-treated 2×4 | Pressure-treated 2×6 (for cold climate) |
| Floor | 3/4″ plywood | 3/4″ T1-11 (waterproof side down) |
| Wall siding | 5/8″ T1-11 plywood | LP SmartSide (engineered, more rot-resistant) |
| Roof sheathing | 5/8″ OSB | 3/4″ plywood (better moisture resistance) |
| Roofing | 3-tab asphalt shingles | 26-gauge metal panels (60+ year life) |
| Hardware cloth | 1/2″ mesh, 19-gauge | 1/4″ mesh, 19-gauge (smaller predators) |
| Predator apron | 12″ buried hardware cloth | 18″ buried + landscape staples |
| Foundation | 4 concrete blocks at corners | Continuous gravel base or skid runners |
Stepping up from minimum to better standards on a 4×8 coop adds $80–$160 in materials and 10–15 years to expected lifespan. Worth it.
Common DIY Coop Mistakes
- Untreated lumber on bottom plate or sill. Bottom-plate rot is the #1 reason coops fail at 8–12 years. Always pressure-treated for any wood touching ground or concrete.
- Chicken wire instead of hardware cloth. Universal beginner mistake. Hardware cloth on every surface, period.
- Insufficient ventilation. Coops without proper gable vents or soffit vents trap ammonia and moisture, damaging both health and structure. Plan 1 sq ft of vent per 10 sq ft of floor.
- No predator apron. Above-ground walls do nothing to stop digging predators. The buried hardware-cloth apron extending outward is mandatory.
- Skimping on roof. Tarp roofs and felt-only roofs leak within 2 years. Use real shingles or metal.
- Single-latch gates. Raccoons defeat single hooks. Use carabiner-secured slide bolts or padlocks.
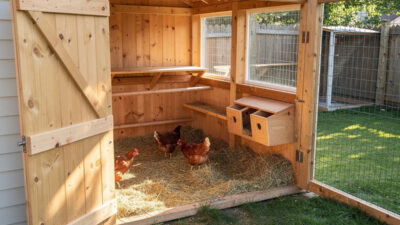
- Forgetting easy clean-out access. Build a large clean-out door at one end. Cleaning a coop through a 2×2 ft pop door is exhausting.
- Mounting nesting boxes too high. Above the roost bar, hens roost in the nesting boxes and eggs get fouled. Place nesting boxes 12–18″ lower than the lowest roost.
Where to Get Free Plans
Several reliable sources for free DIY chicken coop plans:
- BackyardChickens forum. User-submitted plans with photos, materials lists, and lessons-learned notes.
- Cornell Cooperative Extension and other land-grant universities publish technical plans free.
- USDA Rural Development publications include several small-livestock structure plans.
- YouTube build-along videos work well for visual learners; pause and screenshot the dimensions you need.
- Pinterest collections can spark design ideas (but verify dimensions before building).
For paid plans (typically $25–$60 for stamped drawings with cut lists), search for “chicken coop plans PDF” or check builder-focused sites like Ana White or My Outdoor Plans.
DIY vs Smart Coop Compatibility
DIY coops integrate beautifully with smart automation — usually better than prefab because you control wiring chases and mounting locations during construction. The standard upgrades:
- Run conduit during framing. Easier than retrofitting later. See our smart chicken coop wiring guide.
- Plan automation zone. A 2×3 ft wall area for the distribution block and power supply, ideally on the people-door wall at chest height.
- Pre-mount blocking. Add framing blocks where cameras, sensors, and the auto door will mount, so screws bite into solid wood.
- Add ethernet drop. A single CAT6 cable from the house pulls double duty for cameras and access points. See our chicken coop WiFi guide.
For a complete smart-coop build approach, see our complete smart chicken coop guide and budget DIY automation guide.
DIY Run and Tractor Variants
Some readers want a smaller, more flexible build than a full coop. Two variants pair well with DIY plans:
- DIY chicken pen. Smaller daytime enclosures often built with PVC and hardware cloth. Useful as a temporary holding pen or starter setup.
- DIY chicken tractor. A movable coop and run combo on skids or wheels. Lets you rotate the flock across pasture without permanent structures. Our chicken tractor guide and portable chicken coops guide cover the broader category, including wheel system options.
For very small flocks (2–4 birds) on smaller properties, a tractor often makes more sense than a permanent coop because the bird waste fertilizes the lawn naturally as the unit moves around the yard each week.
Match Coop Size to Flock Count
Choose your DIY plan size based on realistic flock count:
| Starting Flock | Build For (50% Growth) | Recommended Plan |
|---|---|---|
| 3 birds | 4–5 birds | 4×4 basic, A-frame tractor, or pallet build |
| 4 birds | 6 birds | 4×8 standard with 6-bird capacity |
| 5–6 birds | 8 birds | 4×8 walk-in or 6×8 walk-in |
| 7–8 birds | 10–12 birds | 6×8 or 8×8 walk-in |
| 10+ birds | 15+ birds | 8×10 walk-in or barn-style with loft |
Build for 50% larger than current flock. Most keepers expand within 24 months, and expanding a coop is far harder than building right initially.
Build Schedule and Time Management
| Plan | Realistic Schedule |
|---|---|
| Beginner pallet coop | 1 weekend (10–14 hrs) |
| 4×4 basic coop | 1 weekend (12–18 hrs) |
| 4×8 standard coop | 2 weekends (18–28 hrs) |
| Garden shed conversion | 1 weekend (10–16 hrs) |
| A-frame tractor | 1–2 weekends |
| Hoop coop | 1–2 weekends |
| 4×8 walk-in with run | 2–3 weekends (24–36 hrs) |
| 6×8 walk-in coop | 3–4 weekends (32–48 hrs) |
| 8×8 walk-in | 4–5 weekends (40–60 hrs) |
| Barn-style + loft | 5–8 weekends (50–80 hrs) |
| Insulated cold-climate | 5–8 weekends (50–80 hrs) |
The realistic schedule includes weather delays, material runs, and the inevitable mid-build mistakes. First-time builders should plan toward the high end of the time range.
Cost Comparison: DIY vs Prefab Equivalents
| Coop Size | DIY Materials | Equivalent Prefab | Savings |
|---|---|---|---|
| 4×4 (4 birds) | $280–$420 | $700–$1,100 | $420–$680 |
| 4×8 (6 birds) | $420–$640 | $900–$1,500 | $480–$860 |
| 6×8 walk-in (8 birds) | $700–$1,100 | $1,500–$2,400 | $800–$1,300 |
| 8×10 walk-in (12 birds) | $1,100–$1,600 | $2,200–$3,500 | $1,100–$1,900 |
DIY savings scale with size — the larger the coop, the bigger the dollar savings. Plus DIY produces a longer-lasting and easier-to-modify result. For most readers, the DIY math is overwhelming.
Frequently Asked Questions
DIY Coop Plans Cluster: 6 Topic Guides
Each major DIY build path above has its own dedicated guide. Use these to go deeper on any specific build before committing to lumber.
Build From Scratch
- Building a Chicken Coop From Scratch: Step-by-Step — full materials list, tool requirements, and the 10-step build sequence for a 4×8 coop
- DIY Chicken House: 6 Beginner-Friendly Builds — six house designs from 3×4 mini to 6×6 walk-in, sized by flock count
- Walk-In Chicken Coop Plans: Free Blueprints — three walk-in blueprints (6×8, 8×8, 8×10) with structural details for 8–15 birds
Repurpose & Convert
- Chicken Coop Shed Conversion: Garden Shed to Coop — six-step process to turn a garden shed into a chicken coop in one weekend
Smaller & Mobile Builds
- DIY Chicken Pen: Free Plans Under $100 — three pen plans (PVC, wood, hoop) for daytime and broody-isolation use
- DIY Chicken Tractor Plans: Free Mobile Coop Builds — four tractor plans (A-frame, hoop, rectangular, Salatin sled) with movement systems
How much does it cost to build a DIY chicken coop?
DIY costs scale with size: a basic 4×4 coop runs $280–$420 in materials, a 4×8 standard coop runs $420–$640, and an 8×10 walk-in coop runs $900–$1,400. Pallet-based budget builds drop to $80–$180 by reusing free materials. All paths save 40–60% versus prefab equivalents.
What is the easiest chicken coop to build?
The pallet coop is easiest for absolute beginners — uses recycled materials, requires only basic hand tools, and assembles in 10–14 hours. The 4×4 basic coop with new lumber is slightly more involved but produces a longer-lasting result for $280–$420. Garden shed conversions are fastest if you already own a shed.
How long does it take to build a DIY chicken coop?
Time scales with size. A pallet or 4×4 coop takes 10–18 hours over one weekend. A 4×8 standard coop takes 18–28 hours over two weekends. Walk-in coops at 6×8 to 8×10 require 32–60 hours over 3–5 weekends. First-time builders should plan toward the high end of these ranges.
What materials do I need for a DIY chicken coop?
Standard 4×8 build needs: pressure-treated 2×4 framing, 5/8 inch T1-11 plywood siding, 3/4 inch plywood floor, 1/2 inch hardware cloth (50+ sq ft), asphalt shingles or metal roofing, screws, hinges, latches, and concrete blocks for the foundation. Total cost $420–$640 in 2026 lumber pricing.
Should I build a chicken coop or buy a prefab one?
DIY beats prefab on cost (40–60 percent savings), lifespan (15–25 years vs 8–15 years), and customization. Prefab beats DIY on time (5–10 hours vs 18–60 hours) and warranty. The math favors DIY for anyone with basic tools and time to commit; prefab wins for anyone short on time or skills.
What is the most common DIY chicken coop mistake?
Using chicken wire instead of hardware cloth. Chicken wire stops chickens from leaving but does not stop predators from entering — raccoons reach through it, weasels squeeze through, foxes tear it open. Use 1/4 inch or 1/2 inch hardware cloth on every opening, vent, and surface where predators could access.
Related Articles
Related Guides
DIY Chicken Tractor Plans: Free Mobile Coop Builds
A DIY chicken tractor — the mobile coop+run combo on wheels or skids — is one of the most-built backyard…
Walk-In Chicken Coop Plans: Free Blueprints
A walk-in chicken coop built with free blueprints delivers the maintenance-friendly height (6.5+ ft ceiling) most backyard keepers eventually wish…
Chicken Coop Shed Conversion: Garden Shed to Coop
Converting a garden shed into a chicken coop shed takes 8–16 hours and $200–$500 in materials, delivers far better insulation…