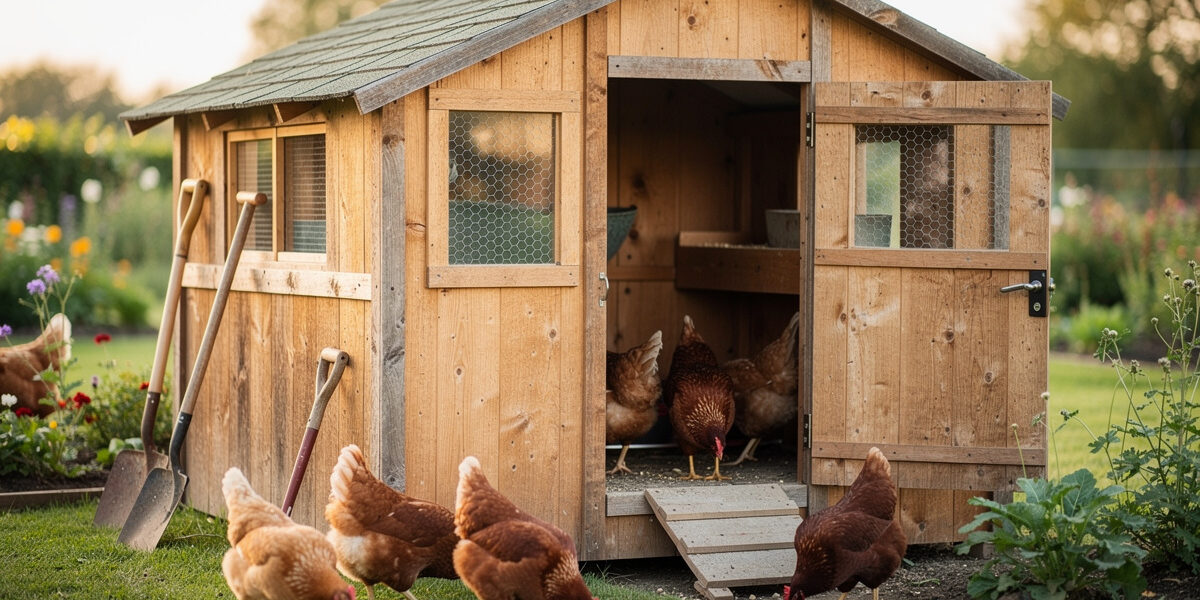
Converting a garden shed into a chicken coop shed takes 8–16 hours and $200–$500 in materials, delivers far better insulation and predator-proofing than most prefab coops, and works for flocks of 4–12 birds depending on shed size. The conversion sequence has six steps: assess the shed, add ventilation, install the pop door, build nesting boxes, add roost bars, and predator-proof every opening. This is often the fastest path to a quality coop if you already own a 6×8 to 8×10 storage shed.
This guide walks through the full conversion process. For ground-up builds, see our DIY chicken coop plans guide or building from scratch step-by-step.
Why Shed Conversions Win
Five reasons converted sheds beat both prefab coops and ground-up builds for many backyards:
- Cost. If you already have the shed, conversion is $200–$500. Equivalent ground-up coop is $700–$1,400.
- Speed. Conversion takes 8–16 hours. Ground-up build takes 24–48 hours.
- Quality. Most garden sheds use 5/8″ plywood walls and proper roof framing — better than budget prefab coops.
- Insulation potential. Sheds have wall cavities that can be insulated for cold-climate keepers.
- Walk-in access. Standard 6×8 sheds have walk-in height already, making maintenance easy.
The path works for any wooden shed in good condition. Plastic resin sheds (Rubbermaid, Lifetime) work too with adaptations. Metal sheds work but conduct cold and need additional insulation in winter.
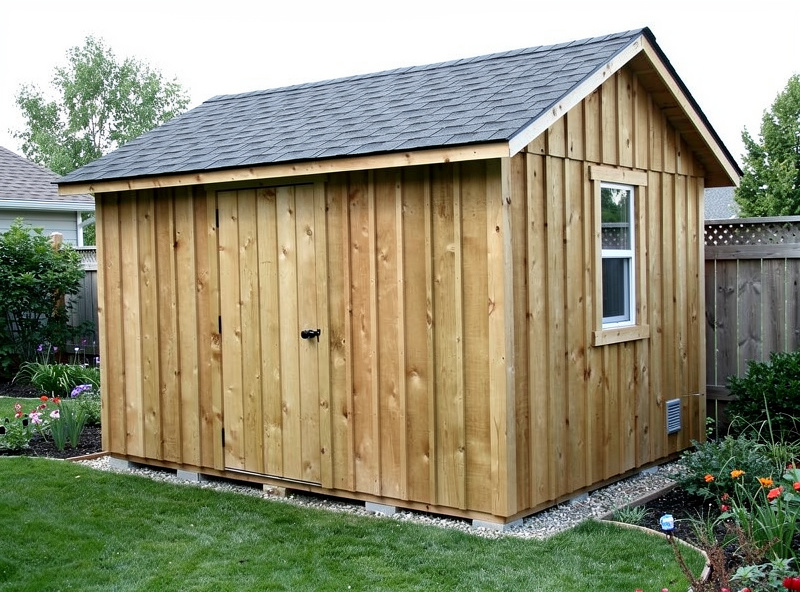
Assessing Your Shed
Before buying conversion materials, evaluate the shed against these checks:
| Check | Pass | Fail (Address Before Conversion) |
|---|---|---|
| Floor condition | Solid plywood, no rot or soft spots | Rotted floor — replace before converting |
| Wall integrity | No gaps, no daylight visible from inside | Gaps, missing siding, cracked panels |
| Roof condition | No leaks, shingles intact | Active leaks or damaged roof |
| Door alignment | Closes properly, no warping | Out-of-square frame, doesn’t latch |
| Foundation | Skids or pad in good shape | Sinking, rotted skids |
| Existing pests | No mouse droppings, no insect damage | Active rodents — exterminate first |
Sheds that pass 5–6 are ideal candidates. Sheds that pass 3–4 need targeted repairs before conversion (replace bottom plates, patch siding gaps). Sheds that fail more than 3 are usually better demolished and rebuilt.
Conversion Materials List (6×8 or 8×8 Shed)
| Item | Cost |
|---|---|
| 1/2″ hardware cloth (40 sq ft) | $45–$70 |
| 1/4″ hardware cloth for vents and chick areas (10 sq ft) | $15–$25 |
| 2×4 lumber for nesting box framing | $30–$50 |
| Plywood for nesting box construction (1/2 sheet) | $30–$50 |
| 2×4 for roost bar | $8–$12 |
| Pop door + auto door mechanism (optional) | $0–$280 |
| Hinges, latches, screws | $30–$60 |
| Bedding (initial) | $25–$45 |
| Vents/louvers (or hardware cloth for DIY vents) | $20–$60 |
| Predator apron (1/4″ hardware cloth, 30 ft × 12″) | $30–$50 |
| Concrete-block foundation reinforcement (if needed) | $0–$80 |
| Total | $233–$782 |
Realistic cost for a typical conversion is $250–$450. The auto door is the biggest swing — skip it for budget builds, add it for smart-coop integration.
Step 1: Add Ventilation
This is the most important step and the one most often skipped. Sheds are designed to be sealed against weather; chicken houses must be ventilated to prevent ammonia buildup and the respiratory damage it causes. This is the step I push hardest on when I’m helping a neighbor plan a conversion — a shed that looks great on the outside can still be a sealed box the moment you close the door.
Plan 1 sq ft of vent area per 10 sq ft of floor. For a 6×8 shed (48 sq ft), that is 4.8 sq ft of vent — typically split between high-mounted gable vents (or roof-eave soffit vents) and lower intake vents. My own coop runs this passively through ridge and soffit vents with no fans, and the payoff shows up as dry litter through a Swedish winter instead of frost forming on the inside of the roof.
Three vent installation paths:
- Cut new vents. Use a jigsaw to cut openings in upper walls or gables; cover with hardware cloth and a louvered cover.
- Open existing vents. Some sheds ship with sealed vent panels — open them and add hardware cloth.
- Install soffit vents. Pre-made soffit vents at the roof eaves work well for high-up airflow.
Place the largest vent area near the roof peak; smaller intake vents lower on opposite walls. The temperature difference creates natural convection that pulls fresh air in and ammonia out without electricity.
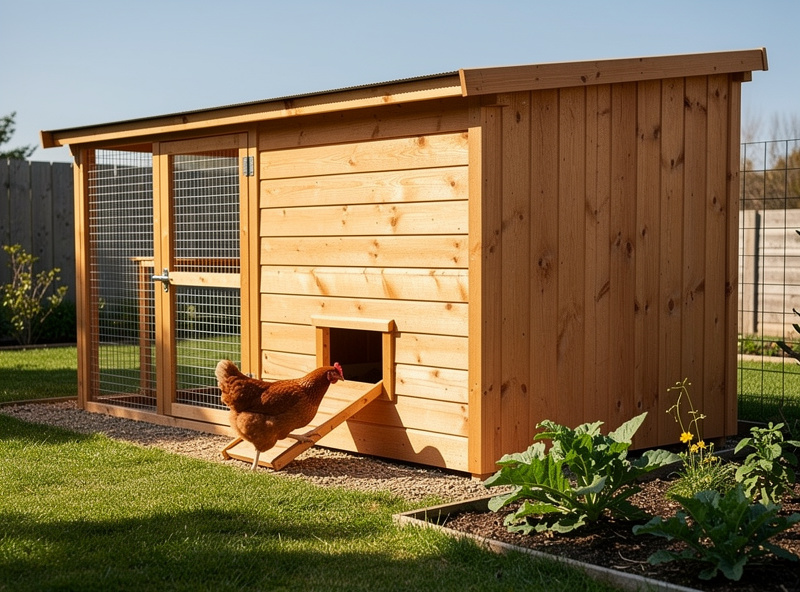
Step 2: Install the Pop Door
The pop door is what chickens use to enter and exit the coop without you opening the main door every time. Standard dimensions: 9–13 inches wide × 12–16 inches tall, mounted on a wall facing the run or free-range area.
- Mark the pop door cutout — typically 6–10 inches off the floor on the run-side wall.
- Drill a starter hole, then jigsaw out the rectangle.
- Trim the cut edges with 1×2 wood for a clean finish.
- Install a sliding door, hinged drop door, or auto door mechanism.
- Cover the opening with hardware cloth when door is in any closed position.
For automation, a battery-powered auto door (ChickenGuard, Run-Chicken, Omlet) installs in 30–60 minutes once the cutout is made.
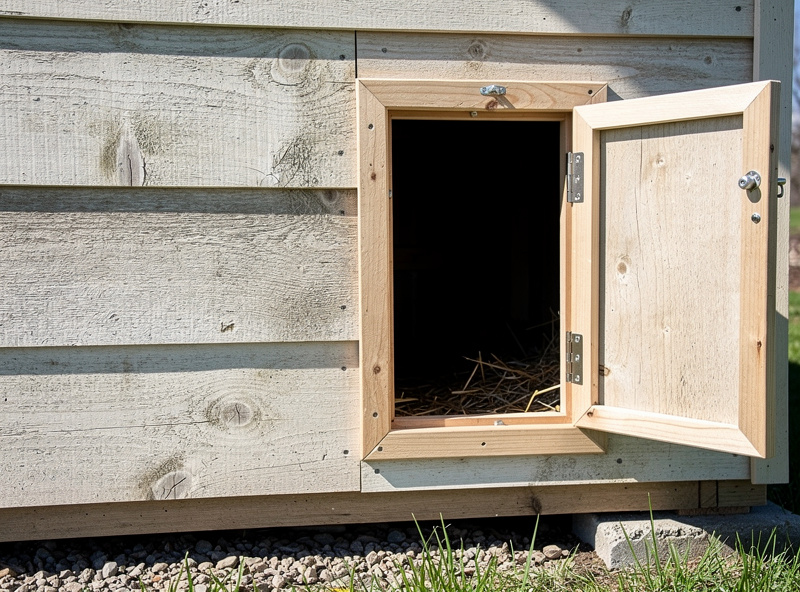
Step 3: Build Nesting Boxes
One nesting box per 3–4 birds. Standard dimensions: 12x12x14 inches.
The most useful nesting box design has external access — a hinged lid on the outside wall of the shed lets you collect eggs without entering the coop. Build sequence:
- Cut a hole in the shed wall at nesting box height (lower than where the roost will be).
- Build the nesting box from 1/2″ plywood, sized to fit the wall opening.
- Mount the box flush with the inside wall, with the access door on the outside.
- Install hinges and a latch on the external access door.
- Slope the access door slightly so eggs do not roll out when you open it.
Step 4: Install Roost Bars
Roost bars give chickens a place to sleep at night. Specs:
- 2×4 mounted flat-side up (chickens grip 2-inch surfaces, not 4-inch)
- Length: 8–12 inches per bird
- Height: 18–24 inches off floor, but always higher than the highest nesting box
- Distance from walls: at least 12 inches to prevent feather rubbing
For a 6×8 shed holding 6 birds, a single 6-foot 2×4 mounted across the long dimension at 24 inches off the floor handles the entire flock.
Step 5: Predator-Proof Every Opening
Sheds are usually predator-tight on the structure but have specific weak points:
- Vents. Cover every vent with hardware cloth screwed to interior framing.
- Pop door. The opening must close securely. Use a heavy-duty auto door or a manual sliding door with a positive latch.
- Main door bottom. Most shed doors have a 1/2″ gap at the bottom that mice and weasels exploit. Add a weatherstrip or sweep.
- Floor-wall joint. Inspect for gaps between the floor and bottom plate; seal any over 1/2″ with hardware cloth and silicone.
- Roof eaves. Check for openings where roof meets walls — common entry for rats and snakes. Seal with hardware cloth.
For ground-level predators, add a buried hardware-cloth apron extending 12–18 inches outward from the shed perimeter. This stops digging predators that the shed walls do not — the apron was the single upgrade that ended the digging attempts at my own run, and it’s the first thing I tell people to budget for rather than treat as optional.
Step 6: Interior Setup
Final touches:
- 4–6 inches of pine shavings, hemp, or sand on the floor
- Feeder mounted at chest height (10–12 inches off floor)
- Waterer hung or mounted to keep waste out
- Optional: small LED light on a timer for winter laying support
For bedding choices, see our chicken coop bedding guide.
Conversion Time Breakdown
| Task | Time |
|---|---|
| Assessment + clean-out | 1–2 hrs |
| Cut and install vents | 2–3 hrs |
| Cut and install pop door | 1–2 hrs |
| Build nesting boxes with external access | 2–3 hrs |
| Install roost bars | 30–45 min |
| Predator-proof every opening | 1–2 hrs |
| Interior setup (bedding, feeders, etc.) | 30–60 min |
| Buried apron extension | 1–2 hrs |
| Total | 9–16 hrs |
Most readers complete the conversion in one weekend. Adding an automatic door and smart sensors adds 2–4 hours.
Capacity by Shed Size
| Shed Size | Floor Area | Bird Capacity |
|---|---|---|
| 6×6 | 36 sq ft | 6–9 birds |
| 6×8 | 48 sq ft | 8–12 birds |
| 8×8 | 64 sq ft | 10–16 birds |
| 8×10 | 80 sq ft | 12–20 birds |
| 10×12 | 120 sq ft | 20–30 birds |
Shed conversions often deliver more bird capacity than equivalent prefab coops because shed dimensions are typically larger to start. A 6×8 garden shed comfortably holds 8–12 birds with proper interior fit-out.
Cold-Climate Conversion Upgrades
For zones 3–5, add insulation during the conversion:
- Wall insulation. R-13 fiberglass batts in 2×4 wall cavities, plus interior plywood lining to keep chickens away from the insulation.
- Vapor barrier. Plastic sheeting between insulation and interior surface to prevent moisture damage.
- Roof insulation. R-19 batts between rafters, with interior ceiling sheathing.
- Insulated pop door. Heavier-grade auto door with weather seals for cold climates.
Cost: adds $180–$320 to the basic conversion. Pays back through reduced supplemental heating and warmer winter laying.
Connecting to a Run
The shed converts to a coop, but chickens still need outdoor space. Three approaches:
- Build attached run. Wood-frame or prefab run attached to the shed wall, sharing the pop-door wall.
- Free-range with electric fence. Larger property; chickens range during daytime, return to converted shed at night.
- Standalone run nearby. Run located near but not attached to shed; short tunnel or covered ramp connects them.
For run construction details, see our chicken run guide and large chicken run guide for bigger flocks.
Common Conversion Mistakes
- Skipping ventilation. Sealed-shed conversions trap ammonia and moisture, killing chickens within months. Always add proper venting.
- Using the existing shed door as the pop door. Full-size human doors are too big and waste heat. Cut a separate pop door.
- Mounting nesting boxes too high. Hens roost in the highest spot — nesting boxes must be lower than the roost or eggs get fouled.
- No external nesting box access. Daily egg collection through the main door gets old. Spend the extra hour on external access.
- Forgetting to seal the bottom door gap. The 1/2″ gap under most shed doors is a major weasel and snake entry point.
- No buried apron. Even a converted shed needs an apron extension for ground-predator protection.
- Using existing shed shelving as roost bars. Shelves are too narrow for proper roosting and often built from materials that hurt feet.
Smart-Coop Integration
Shed conversions integrate beautifully with smart automation. The shed structure typically has more space and better mounting surfaces than purpose-built coops. During conversion, plan:
- Run conduit through walls during venting and door cutouts.
- Reserve a 2×3 ft wall area near the people door for the future automation distribution.
- Mount the auto door during conversion rather than retrofitting later.
- Add a single CAT6 ethernet drop from the house if WiFi signal is marginal.
For full smart-coop wiring details, see our smart chicken coop wiring guide. For component selection, see our best smart chicken coop devices guide. The door on my own coop runs off a sunrise/sunset offset through Home Assistant rather than a dumb timer, and the PoE cameras feed the same NVR as the rest of the house — worth planning the wall space and conduit for that during conversion even if you’re not automating everything on day one.
Frequently Asked Questions
Can a garden shed be turned into a chicken coop?
Yes — most wooden garden sheds 6×6 to 10×12 in good condition convert cleanly with $200–$500 in materials and 8–16 hours of work. Plastic resin sheds work with adaptations. Metal sheds work but need additional insulation for cold climates. The shed must be predator-tight, leak-free, and have a sound floor.
How much does it cost to convert a shed to a chicken coop?
Realistic conversion cost is $200–$500 for the core build on a 6×8 to 8×10 shed: hardware cloth (both wire gauges), nesting box lumber and plywood, hinges and latches, vents, bedding, and a predator apron. Skip the auto door and the numbers land near the low end; add a $150–$280 auto door and any needed foundation reinforcement and the full range extends to $233–$782, matching the itemized materials table above.
How long does shed conversion to chicken coop take?
A standard conversion takes 9–16 hours over one weekend. Adding ventilation cuts is 2–3 hours, building external-access nesting boxes 2–3 hours, predator-proofing 1–2 hours. Cold-climate insulation upgrades add 4–6 hours. Most builders finish in one weekend with basic tools.
Do I need to add ventilation when converting a shed?
Yes, mandatory. Sheds are designed to be weather-sealed; chicken houses must be ventilated to prevent ammonia buildup and respiratory disease. Plan 1 sq ft of vent area per 10 sq ft of floor. Place the largest vents near the roof peak with smaller intakes lower on opposite walls.
What size shed do I need to convert to a chicken coop?
A 6×6 shed (36 sq ft) handles 6–9 birds. A 6×8 shed (48 sq ft) handles 8–12 birds. An 8×10 shed (80 sq ft) handles 12–20 birds. Match shed size to your flock plus 50% expansion room. The 4 sq ft per bird interior minimum applies to converted sheds same as ground-up coops.
Can I keep using the shed for storage after conversion?
Generally no. Chickens kick up dust and droppings that contaminate stored items. Some keepers use a divided shed with chickens in one half and storage in the other, separated by a hardware-cloth wall. The cleaner approach is full conversion plus a separate small storage shed for tools.
Related Articles
- DIY Chicken Coop Plans: 12 Free Designs by Skill Level
- Building a Chicken Coop From Scratch: Step-by-Step
- DIY Chicken House: 6 Beginner-Friendly Builds
- Best Chicken Coop Bedding: Complete Material Guide
- Chicken Run Guide: Sizing, Materials & Best 2026 Models
Related Guides
DIY Chicken Tractor Plans: Free Mobile Coop Builds
A DIY chicken tractor — the mobile coop+run combo on wheels or skids — is one of the most-built backyard…
Walk-In Chicken Coop Plans: Free Blueprints
A walk-in chicken coop built with free blueprints delivers the maintenance-friendly height (6.5+ ft ceiling) most backyard keepers eventually wish…
DIY Chicken House: 6 Beginner-Friendly Builds
A DIY chicken house — the small enclosed shelter where birds sleep, lay, and wait out bad weather — can…