Learn how automatic chicken coop doors work — motor types, sensor systems, power sources, safety features, and how to choose the right one for your coop and climate.
An automatic chicken coop door replaces the daily chore of manually opening and closing your coop with a motorized system that responds to light, time, or remote commands. Understanding the internal mechanics — sensors, motor types, power sources, and safety features — helps you pick the right model and troubleshoot problems before they cost you a bird.
Core Components of Every Automatic Chicken Coop Door
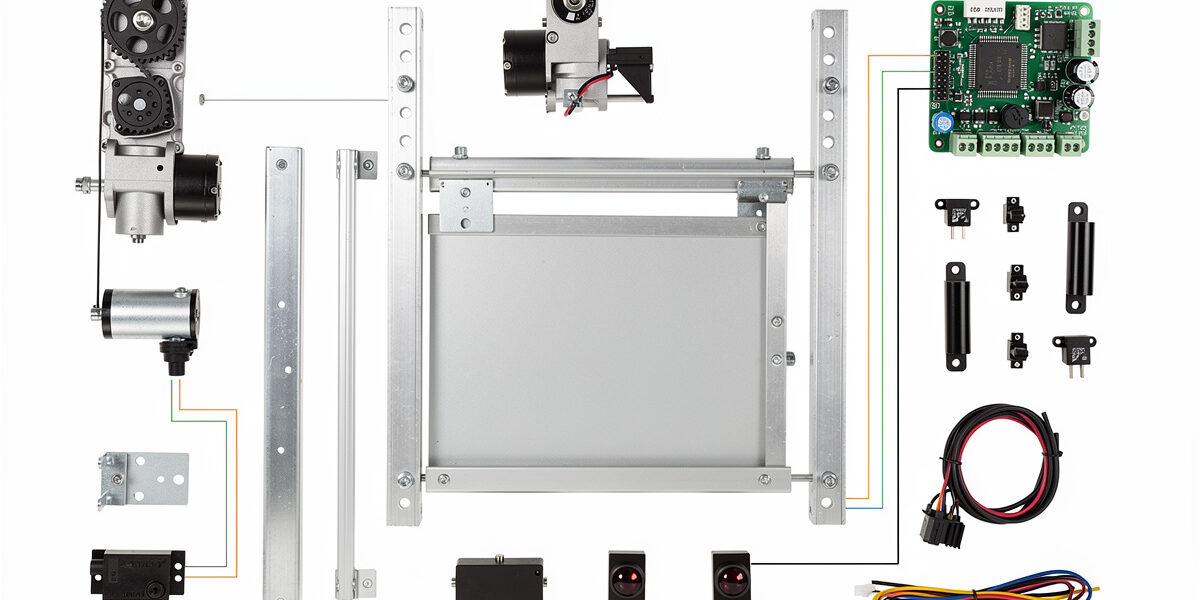
Every automatic chicken coop door, regardless of brand or price, relies on four essential subsystems working together. When any one fails, the door either stays open (predator risk) or stays closed (flock trapped inside). Knowing each component lets you diagnose issues in minutes rather than hours.
The Controller Board
The controller board is the brain. It receives input from sensors, checks programmed schedules, and sends signals to the motor. Budget doors use simple relay-based boards with minimal logic. Premium models run microcontrollers that handle multiple sensor inputs simultaneously, store settings during power loss, and communicate with smartphone apps via Wi-Fi or Bluetooth.
Most controller failures stem from moisture intrusion. A conformal coating or sealed enclosure protects the board from condensation — a real concern inside humid coops. When evaluating a door, check whether the controller is housed in a weather-sealed box or exposed on the back of the door panel.
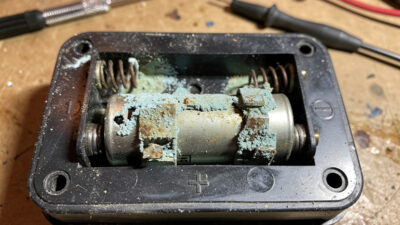
The Motor and Drive Mechanism
Two motor types dominate the market:
| Motor Type | How It Works | Pros | Cons | Common In |
|---|---|---|---|---|
| DC gear motor (string lift) | Spool winds string attached to door panel, lifting it vertically | Simple, cheap, easy to replace | String frays over time, limited lifting force | Budget doors ($30-$80) |
| DC gear motor (rack and pinion) | Geared track drives door up and down on rails | Reliable, strong lift force, no string to break | More expensive, heavier mechanism | Mid-range and premium ($80-$250) |
| Linear actuator | Extends/retracts a rod to push door open or pull it shut | Very strong, works for heavy doors, weather-sealed | Slow movement, expensive, harder to retrofit | Premium and DIY ($100-$300) |
| Stepper motor | Precise rotational control drives door via belt or gear | Exact positioning, quiet operation | More complex controller needed, higher cost | High-end smart doors ($150+) |
String-lift systems account for roughly 60% of the market because they are inexpensive and simple to install. The trade-off is maintenance — most manufacturers recommend replacing the lifting string every 12-18 months to prevent snapping. Rack-and-pinion systems eliminate this weak point entirely, making them the preferred choice for keepers who want to install once and forget.
The Door Panel
The panel itself matters more than most buyers realize. Lightweight aluminum panels (1-2 mm thick) suit string-lift systems but dent easily and offer minimal insulation. Thicker aluminum or composite panels (3-5 mm) resist damage from raccoons attempting to pry them open and provide better insulation during winter.
Panel weight directly affects motor longevity. A 200g aluminum panel puts minimal stress on a small DC motor. A 600g panel with added insulation needs a stronger motor or the gear train wears out prematurely. Match panel weight to motor specification — manufacturer pairing handles this, but DIY builders must calculate carefully.
The Sensor System
Sensors determine when the door opens and closes. Three sensor types exist, each with distinct behavior patterns that affect your flock differently depending on your geographic latitude, seasonal daylight shifts, and coop placement.
Sensor Types: Light, Timer, and Smart
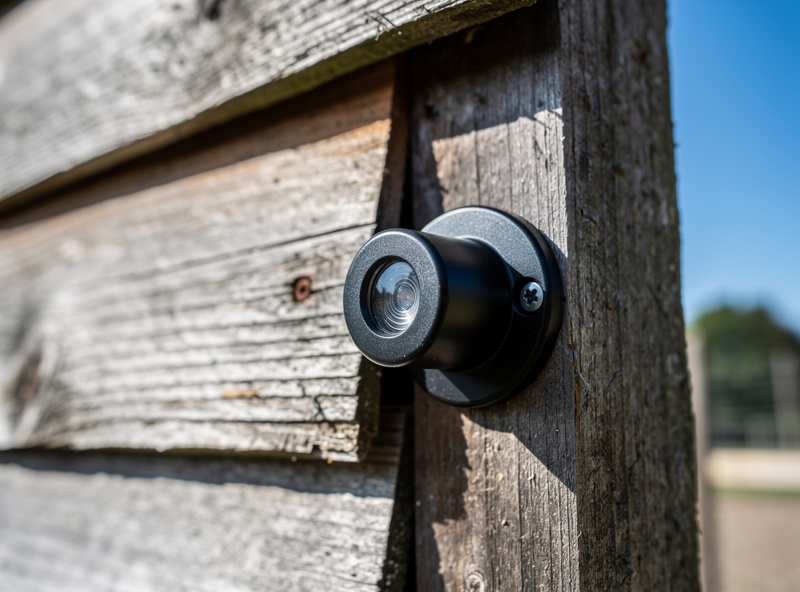
Light Sensors (Photocells)
A photocell measures ambient light intensity and triggers the motor when brightness crosses a preset threshold. At dawn, increasing light opens the door. At dusk, fading light closes it. This approach mirrors natural chicken behavior — chickens roost as light fades and become active at first light.
Light sensors work well in most climates but have known edge cases. Heavy overcast days can trick the sensor into closing early. Snow reflection can prevent closing at dusk by bouncing enough ambient light to keep readings above the threshold. Streetlights or security lights near the coop can prevent closing entirely.
To mitigate these issues, position the light sensor facing north (in the Northern Hemisphere) or south (Southern Hemisphere) to minimize direct sun glare. Shade it from artificial light sources. Some premium models include sensitivity adjustment dials that let you fine-tune the trigger point for your specific environment.
Timer-Based Control
Timer doors open and close at fixed times you program manually. They ignore ambient light entirely, providing predictable operation regardless of weather or artificial light interference. The downside is maintenance — you must reprogram times as seasons shift. A door set to close at 8:30 PM in June will close 2+ hours after dark in December, leaving your flock exposed.
Some keepers combine timer and light sensor as a dual-mode system. The light sensor handles daily operation while the timer provides a backup — if the light sensor hasn’t triggered closing by a set time, the timer forces it. This belt-and-suspenders approach eliminates the vulnerabilities of either system alone.
Smart / App-Controlled Doors
Wi-Fi and Bluetooth-enabled doors let you open and close remotely via smartphone. Many also integrate with home automation systems like Home Assistant, Alexa, or Google Home. Smart doors typically include both light sensor and timer functions plus manual override from anywhere with cellular coverage.
The genuine advantage of smart doors is monitoring. Push notifications confirm the door opened and closed each day. Camera-equipped models show live video of the door position. You know — not assume — your flock is secure. For keepers who travel or work long hours, this visibility justifies the premium price.
| Sensor Type | Best For | Watch Out For | Typical Price Impact |
|---|---|---|---|
| Light sensor only | Rural coops away from artificial light | Snow reflection, overcast false triggers, streetlights | Included in base price |
| Timer only | Urban coops near lights, consistent schedule keepers | Seasonal reprogramming required every 4-6 weeks | Included in base price |
| Light + timer (dual) | Most keepers, all climates | Slightly more complex setup | +$0-20 |
| Smart (Wi-Fi/Bluetooth) | Travelers, tech-savvy keepers, Home Assistant users | Wi-Fi range, app reliability, battery drain | +$50-150 |
Power Sources: Battery, Solar, and Mains
Power determines reliability in the worst conditions — the exact moments when a functioning door matters most. A door that fails during a power outage on a freezing night with active predators is worse than no door at all, because it gives false confidence.
Battery Power
Most standalone doors run on 4×AA batteries or a rechargeable lithium pack. Battery life ranges from 3 months (budget doors, cold climates, heavy use) to 12 months (premium doors, moderate climates, efficient motors). Cold temperatures degrade battery performance significantly — expect 30-50% shorter life below 0°C (32°F).
Battery low indicators are essential. Without one, your only warning is a door that stops working. Premium doors alert via LED, buzzer, or app notification when voltage drops below a safe threshold, giving you days or weeks to replace batteries before failure.
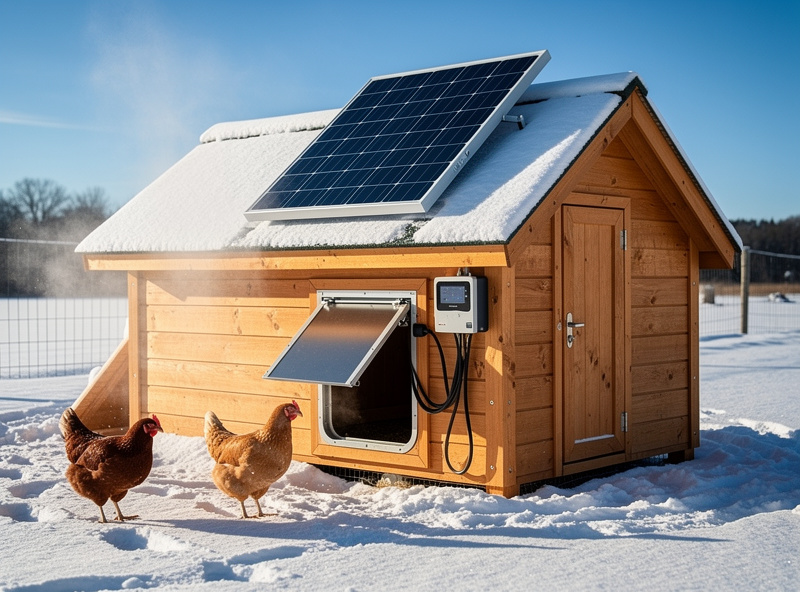
Solar Power
Solar-powered doors pair a small photovoltaic panel (typically 2-6W) with a rechargeable battery. The panel charges the battery during daylight, and the battery powers motor operations at dawn and dusk. Properly sized systems run indefinitely without battery replacement.
Solar works brilliantly in most climates but requires panel placement planning. The panel needs 3-4 hours of direct sunlight daily to maintain charge. Shaded coops, heavy tree cover, or north-facing installations (Northern Hemisphere) may not generate enough power during winter months. Tilt the panel toward the winter sun angle for year-round reliability.
Mains Power (AC Adapter)
Wired doors plug into standard household outlets via a low-voltage adapter (typically 12V DC). They never run out of power — unless the grid goes down. For coops near the house with accessible outlets, mains power eliminates battery concerns entirely. Pair with a small UPS (uninterruptible power supply) for power outage protection.
Safety Features That Protect Your Flock
A closing door can injure or kill a chicken caught in its path. Safety features prevent this, and their presence or absence should heavily influence your purchasing decision.
Anti-Crush / Anti-Pinch Detection
The most critical safety feature. When the door encounters resistance during closing — a chicken still passing through — it stops and reverses direction. Implementation varies by manufacturer:
- Current sensing: The motor draws more current when meeting resistance. The controller detects the spike and reverses. This is the most common and effective method.
- Infrared beam: A sensor across the door opening detects objects in the path before closing begins. Less common but prevents the door from even starting to close while a chicken is present.
- Pressure strip: A contact sensor on the door bottom edge detects physical contact and triggers reversal. Simple but reliable.
Some budget doors lack anti-crush entirely. If you keep bantam breeds or have young pullets that roost late, this feature is non-negotiable. A standard chicken coop door exerts 2-5 kg of closing force — enough to seriously injure a small bird.
Manual Override
Every automatic door should include a manual override that lets you open or close the door without power. During battery failure, controller malfunction, or emergency situations, you need physical access. Most designs use a simple slide mechanism that bypasses the motor — pull a pin, slide the door manually. Verify this exists before purchasing.
Weather Sealing
Rain, snow, dust, and humidity destroy electronics and corrode motors. Weather sealing protects the controller, motor, and wiring from the elements. Look for IP65 or IP67 ratings on the controller enclosure. Brush seals around the door panel prevent drafts and water ingress into the coop.

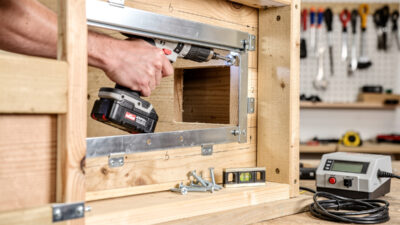
Installation: What to Expect
Installation complexity varies dramatically between models. Understanding what is involved prevents buying a door you cannot physically install on your existing coop.
Vertical Slide Doors (Most Common)
These mount on the outside or inside of the coop wall above the chicken entrance. The door panel slides vertically in tracks. Installation requires:
- A flat mounting surface above the pop hole (at least 30 cm / 12 inches of clearance above the opening)
- Four screws to mount the track/frame assembly
- Proper alignment so the door panel slides freely without binding
- Sensor positioning (light sensor needs sky view, not facing a wall)
Most keepers complete installation in 30-60 minutes with a drill and level. The most common mistake is insufficient clearance above the pop hole — measure twice before ordering.
Horizontal Slide Doors
Less common but useful for coops with limited vertical space. The door panel slides sideways into a pocket or along a track. Installation is similar but requires lateral clearance equal to the door width on one side.
Retrofitting Existing Coops
Most automatic doors are designed to retrofit onto existing coops. Key considerations:
- Pop hole size: Standard doors fit openings 25-30 cm wide × 30-35 cm tall (10-12″ × 12-14″). Measure your existing opening. Oversized openings may need an adapter frame.
- Wall thickness: Most mounts accommodate walls 15-40 mm thick. Log cabin coops or thick insulated walls may need extended mounting hardware.
- Material: Wood coops accept screws directly. Metal or plastic coops may need through-bolts or adhesive mounts.
Common Failure Points and Prevention
Understanding what breaks and why helps you maintain your door proactively rather than discovering problems after a predator visit.
| Component | Failure Mode | Cause | Prevention | Replacement Cost |
|---|---|---|---|---|
| Lifting string | Frays or snaps | UV exposure, abrasion, moisture weakening | Replace every 12 months, use braided cord | $2-5 |
| Batteries | Insufficient voltage | Age, cold temperatures, parasitic drain | Check monthly, use lithium in cold climates | $5-15 |
| Controller board | Erratic behavior or dead | Moisture ingress, voltage spikes | Seal enclosure, use surge protector on mains | $20-60 |
| Motor gears | Grinding or stalling | Overloading from heavy/misaligned door panel | Lubricate annually, check alignment quarterly | $15-40 |
| Light sensor | False triggers | Dirt buildup, spider webs, artificial light | Clean sensor monthly, shield from external light | $5-10 |
| Solar panel | Insufficient charging | Dirt, shade, panel angle wrong for season | Clean quarterly, adjust angle for winter | $10-25 |
Automatic vs Manual Doors: The Real Cost Comparison
The upfront cost of an automatic door ranges from $30 for a basic string-lift to $300 for a premium smart door with camera. Compare this against the hidden costs of manual operation:
| Cost Factor | Manual Door | Automatic Door | Notes |
|---|---|---|---|
| Purchase price | $0-15 | $30-300 | One-time cost |
| Annual time cost (60+ hours) | $900+ at $15/hr | $0 | Your time has value |
| Chicken sitter (2 weeks/year) | $70-140 | $0 | If you ever travel |
| Predator losses (avg 1 bird/year) | $15-50 | $0 | Missed closings |
| Annual maintenance | $0 | $5-20 | Batteries, string |
| 5-Year Total | $4,825+ | $130-400 | Automatic pays for itself in weeks |
Even at the most conservative estimate, an automatic door pays for itself within the first month when you factor in time savings alone. Add predator protection and travel freedom, and the return on investment is overwhelming.
Choosing the Right Door for Your Setup
Match your door selection to your specific situation. No single model works best for everyone — your climate, coop design, flock size, and technical comfort level all influence the ideal choice.
- Small flock (3-6 birds), budget-conscious: Battery-powered string-lift with light sensor. Reliable, affordable, easy to install. Replace string and batteries annually.
- Medium flock (6-12 birds), off-grid coop: Solar-powered rack-and-pinion with dual light/timer sensor. No battery replacement, strong motor handles larger door panels, backup timer prevents light sensor issues.
- Large flock (12+ birds), tech-savvy keeper: Smart Wi-Fi door with camera, anti-crush detection, and Home Assistant integration. Monitor remotely, receive alerts, automate alongside other coop devices.
- Cold climate (-20°C and below): Mains-powered or solar with lithium battery backup. Standard alkaline batteries fail in extreme cold. Rack-and-pinion motor prevents string freezing in ice.
- Urban coop near streetlights: Timer-based or smart door. Light sensors are unreliable near artificial light. Program exact open/close times and adjust seasonally.
How long do automatic chicken coop door batteries last?
Most automatic chicken coop doors running on 4×AA batteries last 3-6 months in moderate climates. Lithium batteries extend this to 6-12 months. Cold temperatures below 0°C (32°F) reduce battery life by 30-50%. Solar-powered models with rechargeable batteries can run indefinitely with 3-4 hours of daily sunlight. Check battery voltage monthly during winter to prevent unexpected failures.
Can an automatic coop door hurt my chickens?
Doors without anti-crush detection can injure chickens caught in the closing path — standard closing force is 2-5 kg, enough to harm bantam breeds. Models with current-sensing anti-crush technology detect resistance and immediately reverse direction, preventing injury. Always choose a door with anti-crush if you keep small breeds, young pullets, or birds that roost late.
Do automatic chicken coop doors work in winter?
Yes, but cold weather requires preparation. Switch to lithium batteries (standard alkaline lose capacity below 0°C), lubricate tracks with silicone spray (not WD-40), and clear ice or snow from the door path regularly. Rack-and-pinion or linear actuator doors handle winter better than string-lift models because strings can freeze or absorb moisture and stiffen.
What is the difference between a light sensor and timer automatic coop door?
A light sensor door opens and closes based on ambient light levels — it naturally tracks sunrise and sunset without reprogramming. A timer door opens and closes at fixed times you set manually, requiring seasonal adjustment every 4-6 weeks. Light sensors can be tricked by artificial light, overcast skies, or snow reflection. Many premium doors offer both modes with timer as a failsafe backup for the light sensor.
Can I install an automatic door on an existing chicken coop?
Yes, most automatic doors are designed to retrofit onto existing coops. You need 30+ cm of clearance above the pop hole for vertical slide doors, a flat mounting surface, and a standard-sized opening (25-30 cm wide × 30-35 cm tall). Installation typically takes 30-60 minutes with a drill. Measure your pop hole dimensions and wall thickness before ordering to ensure compatibility.
Related Articles
- Automatic Chicken Coop Doors: Complete Buyer\’s Guide 2026 — detailed model reviews and top picks
- How to Build a Smart Chicken Coop: The Complete 2026 Guide — full automation including doors, feeders, and monitoring
- Best Smart Chicken Coop Devices & Automation Tools 2026 — the broader ecosystem of coop tech
- Smart Chicken Coop Monitoring: Cameras, Sensors & Apps — pair your door with monitoring for complete security
- Smart Chicken Coop on a Budget: DIY Automation Under $200 — budget-friendly automation including door options
Related Guides
Smart Coop Door Schedules: Alexa, Google, Home Assistant
A smart coop door scheduled to local sunrise and sunset spends roughly 365 hours a year transitioning between open and…
Automatic Coop Door Problems: Troubleshooting and Maintenance Guide
Fix every automatic coop door problem — dead batteries, stuck panels, sensor failures, grinding motors, and seasonal issues. Complete troubleshooting…
Automatic Chicken Door Openers: Installation and Setup Guide
Step-by-step guide to installing an automatic chicken door opener — tools, pop hole prep, mounting, sensor setup, testing, and troubleshooting…