Step-by-step guide to installing an automatic chicken door opener — tools, pop hole prep, mounting, sensor setup, testing, and troubleshooting common problems.
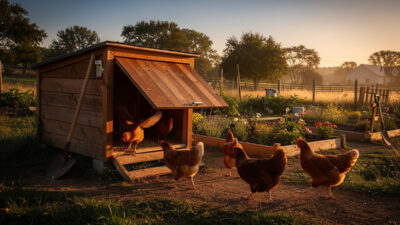
Installing an automatic chicken door opener takes 30-90 minutes depending on your coop design and the door model. Get it right the first time and your door will operate flawlessly for years. Get it wrong and you will fight binding panels, false sensor triggers, and premature motor failures. The first opener I mounted I rushed — set the track a couple of degrees off plumb, and it bound and stalled inside a week until I pulled it and redid it dead level. This step-by-step guide covers every installation type with solutions for the problems that trip up first-time installers (most of which I have made at least once).
As an Amazon Associate I earn from qualifying purchases.
If you have not picked a unit yet, the self-contained battery and solar automatic door openers are by far the easiest to install — no wiring, just a few screws and a light sensor. For a model-by-model breakdown see my 7 doors compared; this guide assumes you have one in hand.
Tools and Materials You Need
Gather everything before starting. Nothing kills momentum like a trip to the hardware store mid-installation.
| Tool / Material | Purpose | Notes |
|---|---|---|
| Cordless drill/driver | Drilling pilot holes and driving screws | Essential — hand screwing into hardwood is miserable |
| Drill bits (3mm and 5mm) | Pilot holes for mounting screws | Match to your screw gauge |
| Spirit level (bubble level) | Ensuring tracks are perfectly vertical | A tilted track causes binding — the #1 installation failure |
| Tape measure | Measuring pop hole, clearance, and mounting positions | Measure twice, drill once |
| Pencil or marker | Marking screw positions | Carpenter pencil works best on rough wood |
| Screwdriver (Phillips #2) | Fine-tuning screw tension | Drill can over-torque into soft wood |
| Silicone sealant | Sealing screw holes and controller housing | Prevents moisture intrusion — critical for longevity |
| Jigsaw or oscillating tool | Cutting or enlarging pop hole if needed | Only if your pop hole needs modification |
| Sandpaper (80 grit) | Smoothing cut edges | Rough edges snag feathers and cause binding |
Step 1: Prepare the Pop Hole
The pop hole is the chicken entrance that the automatic door will cover. Its condition directly determines installation success.
Inspect the Opening
Check the pop hole for square corners, flat edges, and consistent dimensions. Run your hand along all four edges — splinters, protruding nails, or rough surfaces will interfere with the door panel sliding smoothly. Sand any rough spots with 80-grit sandpaper until smooth.
Measure the opening width at the top and bottom. If the measurements differ by more than 3mm, the opening is not square. Most automatic doors tolerate minor irregularity, but a significantly out-of-square opening causes the panel to bind in the track. Shim or plane the frame to within 3mm consistency before mounting.
Size Check
Compare your pop hole dimensions against the door manufacturer’s specifications. Standard automatic doors fit openings 25-30 cm wide × 30-35 cm tall. If your pop hole is larger, you will need the manufacturer’s adapter frame or a DIY adapter — a piece of plywood with a correctly sized cut-out, mounted over the existing opening.
If your pop hole is too small, you have two options: enlarge it with a jigsaw (measure three times, cut once), or choose a door model designed for smaller openings. Enlarging is straightforward in wood coops but risky in metal or plastic enclosures where cutting weakens the structure.
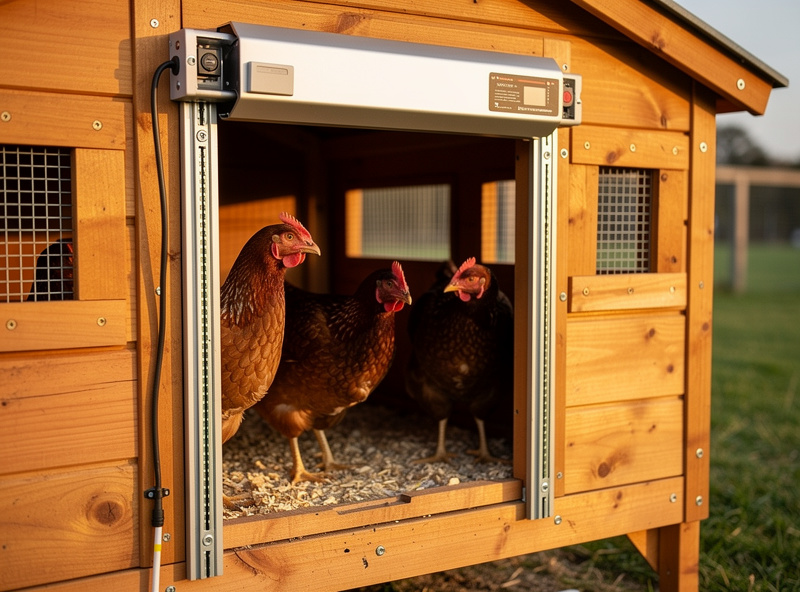
Step 2: Position the Door Assembly
Interior vs Exterior Mounting
Most automatic doors can mount on either the inside or outside of the coop wall. Each position has implications:
| Mounting Position | Advantages | Disadvantages |
|---|---|---|
| Exterior | Easy access for maintenance, does not reduce interior coop space, better weather sensor exposure | Exposed to rain/snow, more visible to predators testing the door |
| Interior | Protected from weather, hidden from predators, warmer motor in winter | Harder to reach for maintenance, reduces headroom if coop is small, sensor may need external placement |
For most coops, exterior mounting is the better choice. Weather protection comes from the door’s own sealing rather than wall shelter, and maintenance access is significantly easier. Interior mounting makes sense only for coops with covered exterior walls (under a porch or overhang) or for metal/plastic coops where exterior screw mounting is difficult.
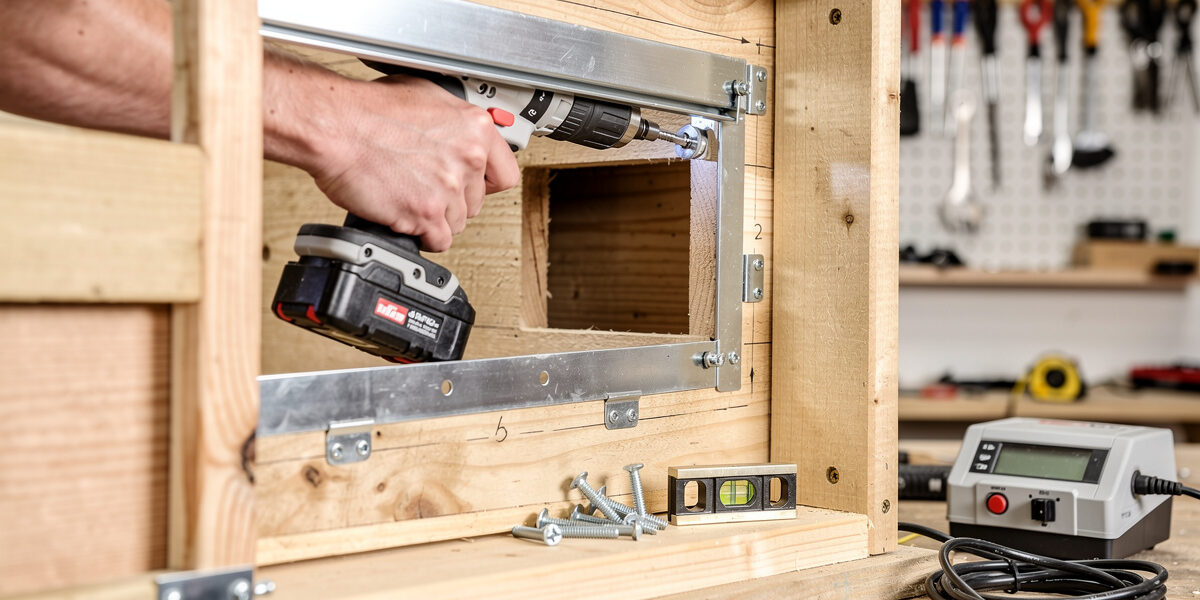
Mark the Mounting Position
Hold the door frame assembly (without the motor unit) against the wall, centered over the pop hole. Use the spirit level to ensure the tracks are perfectly vertical. Mark all screw hole positions with your pencil.
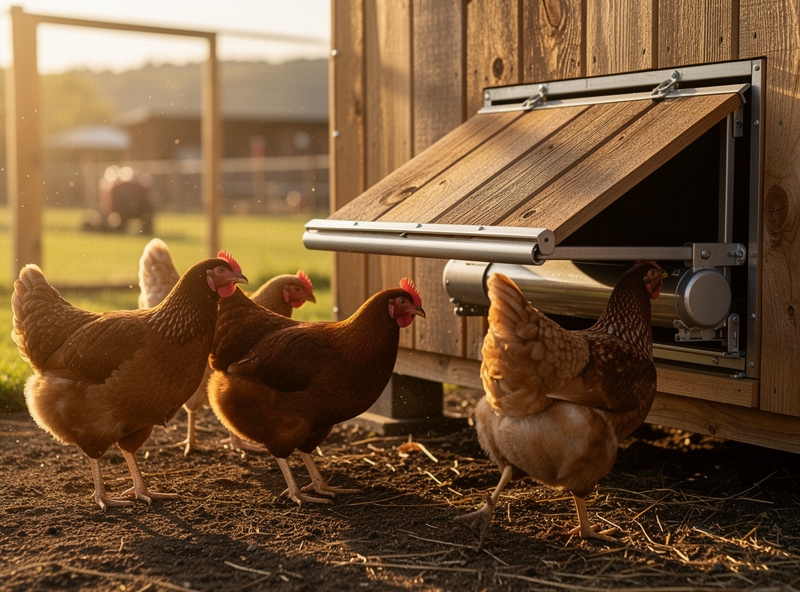
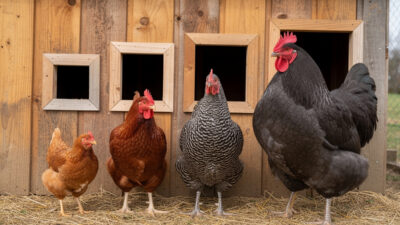
Critical alignment check: The door panel must clear the pop hole entirely when fully open. If the panel only lifts 80% of the way, your chickens must duck to enter — and some will refuse. Confirm that the fully raised panel position clears the top of the pop hole by at least 2 cm.
Step 3: Mount the Track and Frame
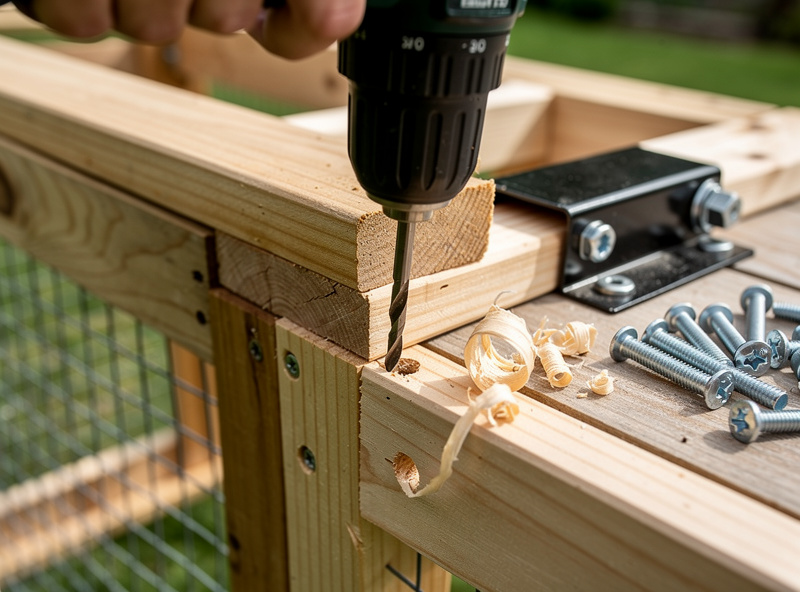
Drill Pilot Holes
Drill pilot holes at every marked position using a 3mm bit. Pilot holes prevent wood splitting and ensure accurate screw placement. Skip this step at your peril — one split board means starting over or patching with ugly hardware.
Apply a small bead of silicone sealant into each pilot hole before driving screws. This simple step prevents moisture from wicking along the screw shaft into the wood, which causes rot around mounting points over time — the same moisture-management logic that drives good coop ventilation in the first place, since trapped moisture (not cold alone) is what actually damages birds and hardware over a winter (Ohio State University Extension). A cheap tube of silicone sealant extends your installation lifespan by years.
Attach the Frame
Drive the mounting screws by hand with a screwdriver for the final few turns. A drill can over-torque into soft wood, stripping the hole and creating a loose mount. Each screw should be snug — not so tight that the frame flexes or the wood compresses around the screw head.
After mounting, slide the door panel into the tracks by hand. It should glide freely from top to bottom with no catching, grinding, or tight spots. If it binds anywhere, loosen the frame screws slightly and re-check alignment with the spirit level. Even a 2-degree tilt creates binding that the motor cannot overcome consistently.
Step 4: Install the Motor Unit
String-Lift Motors
The motor unit mounts above the door frame, typically with two screws. Route the lifting string through the provided guide or pulley and attach it to the top center of the door panel. Ensure the string runs straight — any lateral angle creates friction and uneven lifting.
Set the string tension so the panel hangs level when powered off. Too much tension holds the panel partially up. Too little slack allows the panel to drop faster than the motor expects during closing, which jams the spool.
Rack-and-Pinion Motors
The motor unit clips or bolts onto the top of the frame rail. The pinion gear engages with a toothed track on the door panel. Ensure the gear meshes cleanly — you should feel slight resistance when turning the gear by hand, but no grinding or skipping. Apply a thin film of white lithium grease to the gear teeth before first use.
Linear Actuators
Linear actuators mount above or beside the door with the extending rod connected to the panel. Two pivot points allow smooth operation without binding. Ensure both pivot brackets are firmly attached — a loose bracket allows the actuator to twist under load, causing premature wear.
Step 5: Configure Sensors and Controls
Light Sensor Placement
The light sensor needs an unobstructed view of the sky. Mount it on the exterior of the coop facing north (Northern Hemisphere) or south (Southern Hemisphere) to avoid direct sun glare. Position it above the roofline shadow so it detects ambient sky brightness rather than shadowed or reflected light.
Common placement mistakes:
- Under the eaves: The sensor reads shadow, not sky brightness. It triggers late in the morning and early in the evening.
- Facing a wall or fence: Reflected light from painted surfaces can prevent proper dusk detection.
- Near a security light: The light keeps the sensor reading “daytime” all night. Move the sensor or the light.
Sensitivity Adjustment
Most light sensors include a sensitivity dial or digital setting. Start at the manufacturer’s default. Observe the door for 3-5 days and adjust if needed. If the door opens too early (before you want chickens out), decrease sensitivity. If it closes too early (before all birds have roosted), increase sensitivity slightly.
Write down your final sensitivity setting and tape it inside the controller housing. When you replace batteries and the controller resets to default, you will know exactly where to set it.
Timer Programming
For timer-based operation, calculate your local sunrise and sunset times (available from any weather service or astronomy website). Set the open time to sunrise and the close time to 30 minutes after sunset — this gives stragglers time to return to the coop after the last light fades. On my own coop I stopped fighting the bare light sensor altogether and run the door on a sunrise/sunset offset through Home Assistant — no security-light false triggers, no monthly drift to chase, and the 30-minute dusk delay is just a number in the automation.
Create calendar reminders to update these times monthly. Daylight shift varies by latitude: at 45°N, sunrise shifts by roughly 2 minutes per day in spring and fall. A month of uncorrected drift means 60 minutes of error.
Step 6: Test Everything Before Relying on It
Manual Cycle Test
Run the door through 10 complete open-close cycles using manual controls. Watch for:
- Smooth operation: The panel should travel evenly without jerking, grinding, or hesitation.
- Consistent speed: Opening and closing speed should be uniform through the full travel.
- Complete opening: The panel must clear the pop hole entirely. Partial opening restricts chicken passage.
- Complete closing: The panel must seat flush at the bottom with no visible gaps. Gaps let predators and cold air in.
- Anti-crush function: If your door has anti-crush, place your hand gently in the door path during closing. The motor should stop and reverse within 1-2 seconds of contact.
Sensor Test
For light sensors: cover the sensor completely with your hand or a cloth. The door should begin closing within 30-60 seconds. Uncover it — the door should begin opening. If response is slow or absent, check wiring connections and sensitivity settings.
For timers: set a test close time 5 minutes from now. Wait and confirm the door closes at the programmed time. Reset to your actual schedule after confirming.
Three-Day Observation Period
Do not leave the door unsupervised for the first three days. Manually check at dawn and dusk:
- Did the door open at the expected time?
- Did all chickens exit the coop through the door?
- Did the door close after all chickens returned to roost?
- Is the door panel seated flush when closed?
- Are there any unusual sounds from the motor?
Three days of clean operation builds confidence. If you see any issues during this period, troubleshoot and resolve before relying on the door for predator protection — worth the patience given predation is consistently the leading cause of death in backyard flocks (eXtension Poultry).
Troubleshooting Common Installation Problems
| Problem | Likely Cause | Solution |
|---|---|---|
| Door binds or sticks mid-travel | Tracks not perfectly vertical | Loosen frame, re-level with spirit level, re-tighten |
| Door opens but does not close | Light sensor near artificial light | Relocate sensor away from streetlights/security lights |
| Door closes mid-afternoon | Light sensor too sensitive / heavy overcast | Reduce sensor sensitivity or switch to dual light+timer mode |
| Motor runs but door does not move | String disconnected or spool jammed | Re-attach string, check spool for tangles |
| Door drops instead of lowering smoothly | String slack or gear teeth not meshing | Adjust string tension or re-seat gear mesh |
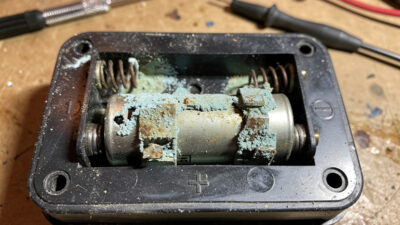
| Controller does not power on | Dead batteries or reversed polarity | Replace batteries, verify polarity markings |
| Motor vibrates but door jams at bottom | Obstruction in track or panel hitting ground | Clear debris, adjust bottom stop position |
| Door closes on chickens | No anti-crush or closing too fast | Enable anti-crush, slow close speed, delay close time |
Seasonal Maintenance Schedule
Once installed, an automatic chicken door opener needs periodic attention to maintain reliability. Most failures are preventable with 15 minutes of quarterly maintenance.
| Season | Tasks | Time |
|---|---|---|
| Spring | Clean tracks and sensor, check string condition, lubricate mechanism, update timer for longer days | 15 min |
| Summer | Check battery levels, clean spider webs from sensor, verify anti-crush function | 10 min |
| Fall | Replace batteries (if due), clean fallen leaves from tracks, update timer for shorter days, apply silicone to seals | 15 min |
| Winter | Switch to lithium batteries (cold climates), check for ice in tracks, verify door seals, test manual override | 15 min |
Frequently Asked Questions
How long does it take to install an automatic chicken door opener?
Most automatic chicken door openers install in 30-60 minutes on a standard wood coop with basic tools (drill, level, screwdriver). Complex installations on non-standard coops — metal siding, thick walls, or oversized pop holes requiring adapter frames — may take 60-90 minutes. First-time installers should allow 90 minutes including the testing phase.
Can I install an automatic door opener on a metal chicken coop?
Yes, but metal coops require self-tapping screws or through-bolts instead of standard wood screws. Pre-drill holes with a metal-appropriate bit. Add rubber washers between the door frame and metal wall to prevent vibration loosening screws over time. Some manufacturers sell metal coop adapter kits with appropriate hardware.
What is the most common automatic chicken door installation mistake?
Mounting the tracks out of vertical alignment is the most common and most damaging mistake. Even a 2-degree tilt creates binding that stresses the motor and causes premature failure. Always use a spirit level during installation and test the panel by hand before powering on the motor. The second most common mistake is placing the light sensor where artificial light or shadows affect its readings.
Do I need an electrician to install an automatic chicken door?
No. Battery-powered and solar-powered automatic doors require no electrical work — they are completely self-contained. Mains-powered doors that plug into an existing outdoor outlet also need no electrician. The only scenario requiring professional help is running new wiring to a coop that lacks a power outlet, which involves outdoor-rated cable and potentially a GFCI circuit.
How do I weatherproof my automatic door installation?
Apply silicone sealant into pilot holes before driving screws to prevent moisture wicking. Seal the controller enclosure with silicone or use a separate waterproof box. Add brush seals around the door frame to block wind-driven rain. Position the motor unit under the coop eaves if possible. For exposed installations, build a small overhang from scrap wood or plastic to shield the motor housing from direct rain and snow.
Related Articles
- How Automatic Chicken Coop Doors Work: Sensors, Motors, and Safety — understand the technology you are installing
- Best Automatic Chicken Coop Doors: 7 Models Compared — pick the right model before installation
- How to Choose the Best Automatic Chicken Door — decision guide for first-time buyers
- How to Build a Smart Chicken Coop — full coop build including door installation
- Automated Chicken Feeders & Waterers — install more automation after your door
Related Guides
Smart Coop Door Brand Compatibility & Failure Modes
Not every coop door brand actually plays nice with a smart-home schedule, and that’s the gap this guide fills. A…
Automatic Coop Door Problems: Troubleshooting and Maintenance Guide
Fix every automatic coop door problem — dead batteries, stuck panels, sensor failures, grinding motors, and seasonal issues. Complete troubleshooting…
How to Choose the Best Automatic Chicken Door for Your Flock
Choose the right automatic chicken door for your coop — pop hole sizing, sensor types, power sources, safety features, predator…