Smart chicken coop technology promises freedom from daily chores, predator protection, and remote monitoring — but the price tags can be intimidating. Full automation systems with automatic doors, smart feeders, WiFi cameras, and climate control can easily exceed $2,000. What if your budget is closer to $200? Or even $100?
The good news: you do not need deep pockets to build a functional smart coop. With creative solutions, DIY ingenuity, and strategic prioritization, you can achieve 80% of the benefits of high-end systems at 20% of the cost. This guide shows you exactly how to build a budget smart chicken coop that automatically manages doors, feeding, watering, and monitoring for under $200.
These solutions prioritize function over fancy features. You will not get smartphone apps or voice control, but you will get automatic door operation, reduced daily chores, and peace of mind — the core benefits that transform chicken keeping from obligation to hobby.
The Automation Priority Ladder: What to Automate First
Not all automation delivers equal value. When working with limited funds, prioritize based on impact:
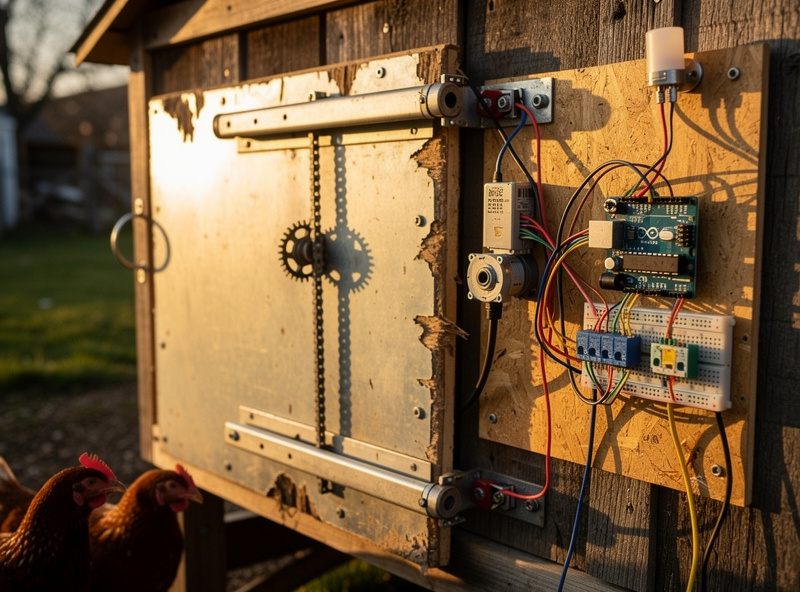
Priority 1: Automatic Door (Maximum ROI)
Cost: $50-$150
Time Saved: 10 minutes daily (60+ hours annually)
Impact: Predator protection, lifestyle freedom, stress reduction
The automatic door is non-negotiable. It is the single most impactful automation you can add. Without it, you remain tied to your property twice daily. With it, you gain the freedom that makes chicken keeping sustainable long-term. It is also your first line of defense against the predators that do the most damage after dark — raccoons, foxes, and the occasional weasel that finds a gap (extension guidance recommends burying hardware cloth at least 12 inches to stop diggers, which is worth doing even on a $50 budget). On my own run the door is one layer on top of a welded frame and a buried hardware-cloth apron — a budget build should treat the door as the first layer, not the only one.
Budget options make this accessible to everyone.
Priority 2: Automated Feeding (Daily Chore Elimination)
Cost: $30-$80
Time Saved: 5 minutes daily (30+ hours annually)
Impact: Consistent nutrition, pest reduction, weekly (not daily) maintenance
Feeding automation transforms daily refills into weekly maintenance. While less lifestyle-changing than door automation, it significantly reduces the daily grind.
Priority 3: Automated Watering (Health Essential)
Cost: $20-$60
Time Saved: 3 minutes daily (18+ hours annually)
Impact: Fresh water availability, reduced disease risk
Water automation is essential for flock health and significantly reduces daily chores. Chickens cannot survive long without water, making this a high-priority upgrade.
Priority 4: Basic Monitoring (Peace of Mind)
Cost: $35-$100
Impact: Remote visibility, problem detection, security
Monitoring cameras provide peace of mind and enable you to check on your flock remotely. While not strictly necessary for flock health, the psychological benefit justifies the cost for many keepers.
$50 Budget Tier: The Absolute Minimum
If $50 is your entire automation budget, spend it here:
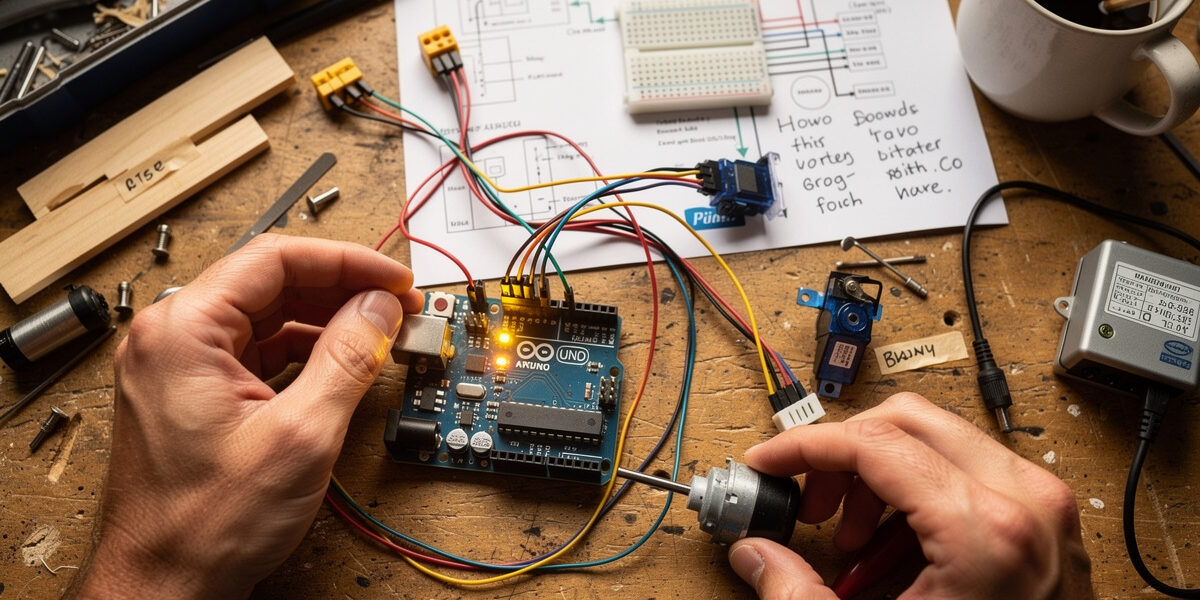
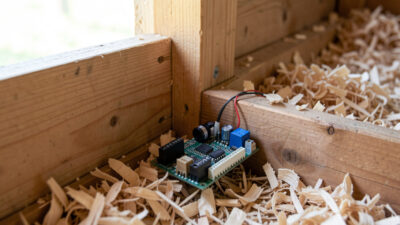
DIY Timer-Controlled Door (Arduino/ESP8266)
Components:
- ESP8266 NodeMCU development board ($5-$8)
- 12V DC motor with gearbox ($8-$12)
- L298N motor driver ($3-$5)
- Real-time clock module ($2-$3)
- Door pulley and cable system ($5-$10)
- 12V power supply ($5-$8)
- Project box and mounting hardware ($5)
Total: $33-$51
How It Works:
The ESP8266 (WiFi-enabled Arduino alternative) uses the real-time clock to trigger door operation at programmed times. Code it to open at 7 AM and close at 8 PM. The motor rotates a pulley system raising and lowering your door. No light sensor — pure timer control.
This is a real tradeoff and worth naming honestly. The door on my own coop triggers off a sunrise/sunset offset through Home Assistant, not a flat clock, so it drifts with the season automatically. A fixed 7 AM/8 PM timer will be off by an hour or more near the solstices unless you go back into the code twice a year. For a $50 starting budget that is a fair trade — just put a reminder on your calendar for the equinoxes.
Build Time: 4-6 hours
Limitations:
- No light sensor (manual seasonal time adjustments needed)
- No smartphone app
- Requires programming knowledge or following online tutorials
- You are your own tech support
Resources: Search “Arduino automatic chicken coop door” or “ESP8266 coop door” for dozens of build tutorials with code.
Alternative: Modified Add-A-Motor D20 (Budget Buy)
If DIY electronics intimidate you, the Add-A-Motor D20 automatic door opener ($149 retail) occasionally goes on sale for $120-$130. Watch for discounts.
Why Consider This: For just $70 more than DIY, you get a proven, warrantied product that works out of the box. The time saved on troubleshooting DIY electronics may be worth the extra cost.
$100 Budget Tier: Door + Feeding Automation
With $100, add feeding automation to your door:
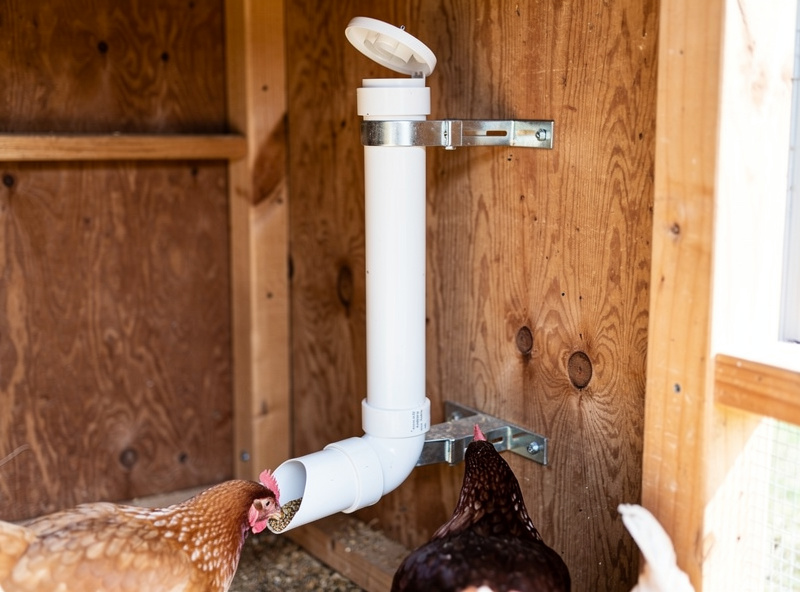
Feeding: Gravity-Fed Port Feeder
Product: RentACoop 10-pound Port Feeder ($35-$45)
Why It Works: No electricity, no batteries, no moving parts. Simply fill the hopper, and gravity feeds chickens through the ports. Refill weekly instead of daily.
DIY Alternative: Build your own gravity feeder using:
- 5-gallon bucket with lid ($5)
- 4-6 PVC elbows ($8-$12)
- Mounting hardware ($5)
Cut holes in bucket, insert PVC elbows as feeding ports, hang at chicken height. Total cost: $18-$22.
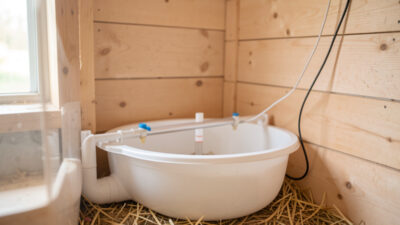
Watering: 5-Gallon Bucket Nipple System
DIY Build:
- 5-gallon food-grade bucket ($6-$8)
- 4-6 horizontal nipples ($8-$12)
- Drill bit for holes ($5)
- Optional: Garden hose float valve ($8)
Total: $20-$35 ($28-$43 with auto-refill)
How It Works:
Drill holes in bucket bottom, thread in nipples, fill with water. Chickens peck nipples to release water. Add garden hose with float valve for truly automatic refilling (never manually fill again until winter).
Budget Summary ($100 Tier):
- DIY automatic door (ESP8266): $40-$50
- DIY gravity feeder: $20
- DIY nipple waterer with auto-refill: $35-$45
- Total: $95-$115
You now have automatic door operation, weekly feeding refills, and water that refills itself from a garden hose. Eliminate 80% of daily chores for under $100.
$150 Budget Tier: Door + Feed + Water + Basic Camera
Adding $50 to the $100 tier gets you a basic monitoring camera:
Camera: Wyze Cam v3
Cost: $35-$49
Why It Is Perfect for Budget Builds: The Wyze Cam v3 delivers premium features at budget pricing:
- 1080p HD video
- Color night vision (starlight sensor)
- Weatherproof (IP65 rated)
- Two-way audio
- Motion detection
- Local storage (microSD, no subscription required)
- Works with Alexa
No cheaper camera delivers this feature set. The color night vision alone is worth the price — you can actually see what is happening in your coop after dark.
Requirements: WiFi signal at coop. If your coop lacks WiFi, skip the camera or add a WiFi extender (adds $30-$60, pushing total to $180-$210).
Budget Summary ($150 Tier):
- DIY automatic door: $40-$50
- DIY gravity feeder: $20
- DIY nipple waterer: $35-$45
- Wyze Cam v3: $35-$49
- Total: $130-$164
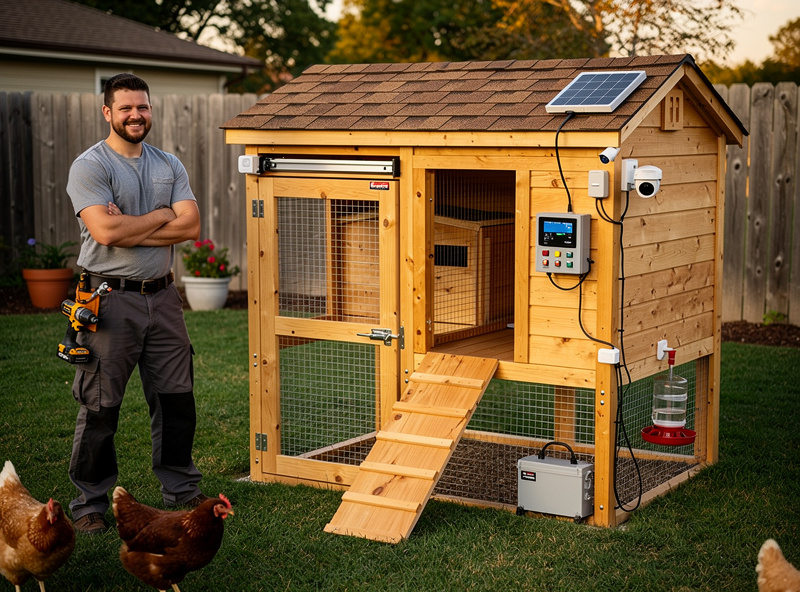
$200 Budget Tier: The Complete Budget Smart Coop
The $200 tier represents the sweet spot — you get a complete, functional smart coop with all core automation systems:
Upgrade 1: Better Automatic Door
Instead of DIY electronics, step up to a proven commercial automatic door:
RUN-CHICKEN Model T50 — $199-$249 retail, but watch for sales ($170-$190)
OR
Add-A-Motor D20 — $149 retail, often $120-$130 on sale
Why Upgrade from DIY:
- Proven reliability
- Warranty protection
- Customer support
- No programming required
- Higher spouse/partner acceptance factor
Upgrade 2: Treadle Feeder (Pest-Proof)
Instead of gravity feeder, invest in a treadle-activated system that keeps rodents out:
Grandpa’s Feeders — $189-$249 (may exceed budget, but watch for used sales)
Budget Alternative: Build your own treadle feeder using:
- Galvanized steel trash can ($25-$35)
- Wooden treadle mechanism ($10-$15 in lumber)
- Feeding ports (modified PVC or metal) ($5)
- Hardware and hinges ($10)
Total DIY: $50-$65
Search “DIY treadle chicken feeder plans” for build instructions. Expect 2-3 hours construction time.
Complete $200 Budget Smart Coop
Configuration Option A (Commercial Products):
- Add-A-Motor D20 (sale price): $120-$130
- RentACoop Port Feeder: $40
- RentACoop Bucket Nipple Waterer: $40
- Total: $200-$210
Configuration Option B (DIY + One Commercial):
- DIY ESP8266 automatic door: $45
- DIY treadle feeder: $60
- DIY nipple waterer with auto-refill: $40
- Wyze Cam v3: $40
- Total: $185
Configuration Option C (All Commercial, No Camera):
- RUN-CHICKEN T50 (sale price): $180
- RentACoop Port Feeder: $40
- RentACoop Bucket Waterer: $40
- Total: $260 (slightly over, but maximum reliability)
Creative Budget Hacks and Money-Saving Strategies
Buy Used or Refurbished
Automatic doors appear on Craigslist, Facebook Marketplace, and eBay regularly as people upgrade or exit chicken keeping. Typical used prices:
- RUN-CHICKEN T50: $100-$140 (vs $200 new)
- Add-A-Motor D20: $80-$110 (vs $150 new)
- Grandpa’s Feeders: $120-$160 (vs $200 new)
Inspect carefully for damage, but these products are built to last — used often means 90% life remaining.
Repurpose Household Items
Before buying new, check what you already have:
Feeders:
- 5-gallon buckets (food-grade) make excellent hopper bodies
- Old Tupperware containers with holes cut in sides
- Trash cans with modified lids for treadle feeders
- PVC pipe sections with end caps for tube feeders
Waterers:
- 5-gallon buckets with homemade nipples
- Large plastic containers with float valves
- Rain barrel systems with gravity-fed chicken access
Door Mechanisms:
- Garage door openers (small units) can be adapted
- Window actuator motors from old cars
- 12V linear actuators from eBay ($15-$30)
Group Buys and Co-Ops
Connect with local chicken keeping groups:
- Buy feeders/doors in bulk for volume discounts
- Share shipping costs on online orders
- Organize tool sharing for DIY builds
- Trade equipment (“I have extra feeders, need a waterer”)
Seasonal Sales
Automatic door prices drop significantly during:
- Post-holiday sales (January-February)
- End of chicken season (October-November)
- Amazon Prime Day (July)
- Black Friday/Cyber Monday (November)
Plan purchases around these windows for 20-30% savings.
DIY Project Details: Build Your Own Automatic Door
For those choosing the DIY route, here are detailed plans for a reliable budget automatic door:
Materials List
Electronics:
- ESP8266 NodeMCU board ($6)
- L298N motor driver ($4)
- DS3231 real-time clock module ($3)
- Breadboard and jumper wires ($3)
- 12V 2A power supply ($6)
Mechanical:
- 12V DC motor with gearbox (30 RPM) ($10)
- Door pulley system or custom track ($8)
- Steel cable or strong cord ($5)
- Door panel (plywood or aluminum) ($10)
- Limit switches (2) ($3)
Miscellaneous:
- Project enclosure ($5)
- Mounting hardware ($5)
- Heat shrink tubing and connectors ($3)
Total: $65-$75 (buying new; less if repurposing materials)
How It Works
Opening Cycle:
- Real-time clock detects programmed open time (e.g., 7:00 AM)
- ESP8266 sends signal to L298N motor driver
- Motor rotates, lowering door via pulley/cable
- Lower limit switch detects door fully open, stops motor
- Door remains open until programmed close time
Closing Cycle:
- Real-time clock detects programmed close time (e.g., 8:00 PM)
- Motor reverses, raising door
- Upper limit switch detects door fully closed, stops motor
Programming the ESP8266
Basic Code Structure:
1. Include libraries (WiFi, RTC, motor control)
2. Set open/close times (7:00 AM, 8:00 PM)
3. Loop continuously checking current time
4. When open time reached, activate motor until lower limit switch triggered
5. When close time reached, reverse motor until upper limit switch triggered
6. Add 10-second delays to prevent rapid cycling
Sample Arduino Code (Simplified):
Search GitHub for “chicken coop door ESP8266” — dozens of open-source projects exist with complete code, wiring diagrams, and 3D printable parts.
Construction Tips
1. Motor Torque:
Ensure your motor provides sufficient torque for your door weight. A 12V 30 RPM motor with 10 kg-cm torque handles most lightweight doors (under 2 kg).
2. Limit Switches:
Essential safety feature — without them, motor continues running after door fully opens/closes, damaging mechanism. Mount magnetic reed switches or mechanical lever switches at door travel extremes.
3. Weatherproofing:
ESP8266 and electronics need protection from coop humidity and temperature extremes. Use outdoor-rated project box with cable glands. Seal all openings with silicone.
4. Power Supply:
Use a 12V power supply rated for at least 2 amps. Motor draws significant current during operation. A weak power supply causes erratic operation.
5. Manual Override:
Add a bypass switch that cuts power to the circuit and allows manual door operation. Essential for debugging, power outages, or emergencies.
6. Battery Backup (Optional):
Add a 12V battery and charging circuit for $20-$30. Ensures door operates during power outages — critical in areas with unreliable electricity.
What’s NOT Worth the Money (Overhyped Products)
Some budget “solutions” waste money. Avoid these:
1. Cheap Timer Outlets for Heat Lamps
Problem: $10 mechanical timers seem like budget climate control. Reality: Temperature swings wildly — chickens freeze at night, overheat during unexpected warm days. A $50 thermostatic controller or basic heated pad is infinitely better.
2. Dollar Store WiFi Cameras
Problem: Unknown-brand cameras at bargain prices promise monitoring. Reality: Poor night vision, unreliable WiFi, security vulnerabilities, no warranty. The Wyze Cam v3 at $35 is the budget camera baseline — anything cheaper is likely junk.
3. Open Trough Feeders Claiming “Automatic”
Problem: Some products label gravity-fed troughs as “automatic feeders.” Reality: These are not automatic — they are just large-capacity troughs. Rodents, wild birds, and weather still contaminate feed. True automation requires port or treadle designs.
4. Solar Panels for Everything
Problem: Adding solar to every device sounds eco-friendly and off-grid cool. Reality: Solar panels, charge controllers, and batteries add $50-$100 per device. A single AC outlet with extension cords or one battery backup system powers everything cheaper and more reliably. Only use solar where absolutely necessary (no electrical access).
5. Overly Complex DIY
Problem: Attempting to build smartphone apps, cloud connectivity, or AI features from scratch. Reality: You will spend 50+ hours debugging code for features commercial products provide at $50-$100. Focus DIY efforts on simple, mechanical automation (doors, feeders) not software complexity.
Upgrade Path: From Budget to Premium
One advantage of the budget approach: you can upgrade gradually as funds allow. Here is the recommended evolution:
Phase 1: Budget Foundation ($200)
- DIY or entry-level automatic door
- DIY gravity or treadle feeder
- DIY nipple waterer
- Basic WiFi camera
Benefits Achieved: 80% of smart coop value at 20% of premium cost.
Phase 2: Reliability Upgrade (+$150-$250)
6-12 months later, upgrade your automatic door to a commercial unit:
- RUN-CHICKEN T50 or ChickenGuard Premium ($200-$300)
- Add heated waterer for winter ($60-$100)
- Add environmental sensor ($25-$50)
Benefits Achieved: Warranty protection, extreme weather reliability, year-round operation.
Phase 3: Smart Integration (+$200-$400)
12-24 months later, add connectivity and control:
- Smart WiFi feeder with app control ($100-$150)
- Second camera for complete coverage ($35-$50)
- Smart switches for climate control ($50-$100)
- Home Assistant hub for automation rules ($100-$150)
Benefits Achieved: Remote management, data tracking, advanced automation.
This phased approach spreads costs over 2 years, lets you prove the concept at low risk, and ensures each upgrade genuinely improves your experience before investing further.
Winter Solutions for Budget Coops
Northern climate keepers face unique challenges. Here are budget solutions for winter automation. One thing worth knowing before you spend a cent on heat: frostbite on a comb is driven mainly by moisture, not raw cold — a dry, well-ventilated coop does more to prevent it than any heat source (poultry.extension.org). On my own Swedish coop the heated waterer runs off a freeze-watch automation rather than staying plugged in all winter — it only kicks on when the sensor reads near freezing, which saves power and catches the rare night a cheap unit’s built-in thermostat sticks.
Heated Water (Under $50)
Option 1: Heated Base Hack
Buy a cheap seedling heat mat ($15-$25) and place under standard waterer. Not thermostatically controlled — manually plug in when freezing temperatures expected. Risk: May overheat in milder winter weather.
Option 2: Aquarium Heater Method
Submersible aquarium heater ($20-$30) in large water bucket. Reliable thermostatic control. Ensure chickens cannot access electrical components.
Option 3: Rechargeable Heated Bowl
Rechargeable heated pet bowls ($40-$60) provide 8-12 hours of warmth per charge. Move indoors at night to recharge.
Door Cold Weather Protection
Budget automatic doors may struggle in extreme cold:
- Use lithium batteries (better cold performance than alkaline)
- Install foam insulation around door mechanism
- Add small heat pack (chemical hand warmer) near motor on coldest nights
- Check and clean door track weekly (ice buildup)
I ran a version of this exact DIY timer door on my own coop for a season before switching to a commercial unit, and I learned the ice-buildup lesson the hard way — a thin skin of ice on the track jammed the motor mid-cycle and the door sat half-open overnight. Nothing got in that time, but it is the kind of near-miss that turns a weekly track check into a habit fast.
Budget Smart Coop Maintenance
Budget automation requires more hands-on maintenance than premium systems. Plan for:
Weekly Checks (10 minutes)
- Verify automatic door operated correctly (check camera footage)
- Confirm feeder not empty
- Check waterer levels and cleanliness
- Quick visual inspection of all equipment
Monthly Maintenance (30 minutes)
- Deep clean waterers (scrub with brush)
- Check and clean door tracks/mechanism
- Inspect feeder for mold or pests
- Test manual door override
- Check battery levels (if battery-powered)
Seasonal Maintenance (1-2 hours)
- Adjust automatic door times for day length changes
- Deep clean entire coop including automation equipment
- Inspect all wiring and connections
- Service or replace batteries
- Winterize or prepare for summer heat
The time invested in maintenance prevents the failures that give DIY automation a bad reputation.
The Bottom Line: Smart Coops Do Not Require Deep Pockets
A fully functional smart chicken coop — automatic door, automated feeding, clean water, and remote monitoring — is achievable for $200 or less. You will not get smartphone apps, voice control, or premium finishes, but you will get the core benefits that transform chicken keeping:
- Predator protection every single night
- Freedom from daily door duty
- Weekly (not daily) feeding maintenance
- Fresh water without constant refilling
- Peace of mind from remote visibility
These benefits are not luxuries reserved for wealthy keepers. They are accessible to anyone willing to invest a little cash and some DIY effort.
The key is strategic prioritization: spend first on the automatic door (non-negotiable), then feeding automation, then water, then monitoring. Build gradually rather than all at once. Use commercial products where reliability matters most (door), DIY where simple mechanics suffice (feeder, waterer).
Your chickens do not care whether their automatic door cost $50 or $500. They care that it opens at dawn and closes at dusk, keeping them safe and comfortable. Deliver that consistently, and you have succeeded — regardless of budget.
Ready to build your budget smart coop? Start with these guides:
- Automatic chicken coop doors — detailed product reviews and DIY plans
- Automated feeders and waterers — all options from budget to premium
- Best smart coop devices — complete product comparisons with budget tiers
- Smart coop building guide — comprehensive automation blueprint
Your smart coop journey does not start with money. It starts with ingenuity, creativity, and the willingness to build something better than you can buy.
Frequently Asked Questions
Can I automate my coop without Wi-Fi?
Yes! Many automatic doors and feeders operate strictly on built-in timers or photoelectric light sensors that work perfectly off-grid without any internet connection.
Do I need coding skills for a DIY smart coop?
Not necessarily. While you can build advanced setups with Arduino or Raspberry Pi, there are plenty of plug-and-play smart plugs (like Kasa or Wyze) that require zero programming to set up schedules.
What is the cheapest way to auto-water chickens?
The best budget method is installing affordable poultry nipples (about $5 a pack) into the bottom of a 5-gallon food-grade bucket suspended in the coop run.
Can a cheap automatic door crush my chickens?
It is a risk with very low-quality knockoffs. Always ensure the automatic door you purchase (even budget models) has a stop-and-reverse safety sensor feature to prevent injury.
How much should I budget for a basic smart coop?
A functional smart coop with automatic door, gravity feeder, nipple waterer, and WiFi camera costs $130-$200 when combining DIY builds with a few affordable commercial products.
Related Articles
- How to Build a Smart Chicken Coop: The Complete 2026 Guide
- Best Smart Chicken Coop Devices & Automation Tools 2026
- Automatic Chicken Coop Doors: Complete Buyer’s Guide 2026
- Automated Chicken Feeders & Waterers Guide
- Smart Chicken Coop Monitoring: Cameras, Sensors & Apps
Related Guides
Water-Level and Flow Sensors: Knowing the Waterer Is Empty Before They Do
A coop water-level sensor tells you the drinker is going dry — or freezing solid — before the flock does,…
Ammonia Sensors for the Coop: Catching Air Problems Before You Smell Them
An ammonia sensor belongs at the birds’ breathing height, close to the litter where the gas is generated, because that…
Node-RED vs Home Assistant Automations for the Coop: When to Use Which
Use native Home Assistant automations for the coop’s simple, safety-critical rules — the sunrise door, the freeze-watch waterer — and…